• Creating an Animated Progress Meter in React Native: A Step-by-Step Guide

    Creating an Animated Progress Meter in React Native: A Step-by-Step Guide

    A popular way to display the status of a job or procedure on a user interface is via progress meters. There are several approaches to building progress meters in React Native. This article will demonstrate how to use the Animated API to make an animated progress meter. We can design a visually beautiful and entertaining lively progress meter by utilizing the Animated API in React Native.

    From creating the project to including the animation, the tutorial will guide you through making an animated progress meter. After the instruction, you will have a basic understanding of how to make lively progress meters in React Native.

    Why Use an Animated Progress Meter?

    You may wish to implement an animated progress meter in your React Native app for several reasons:

    • Your app’s animations may give it more life and engagement. They can enhance the interactive and engaging experience of your app, which can assist in maintaining users’ attention. Users may see how far along they are in a task or how much time they have left to finish it with the help of an animated progress meter, for instance. Users may remain motivated and interested in the current work due to this.
    • Animations can help people to understand information more quickly. Users may see how far along they are in a task or how much time they have left to finish it with the help of an animated progress meter, for instance. This is more user-friendly than merely showing a number figure since it lets consumers see how the task progresses.
    • Using animations can enhance the visual appeal of a user interface. Adding a well-animated progress meter can make your software more polished and professional. This may contribute to improving your app’s overall user experience.
    • Animated progress meters can serve as a valuable tool for enhancing the user experience of your React Native project. They may make an interface more aesthetically attractive, present information more naturally, and offer a sense of vitality and engagement.

    How to Create an Animated Progress Meter in React Native?

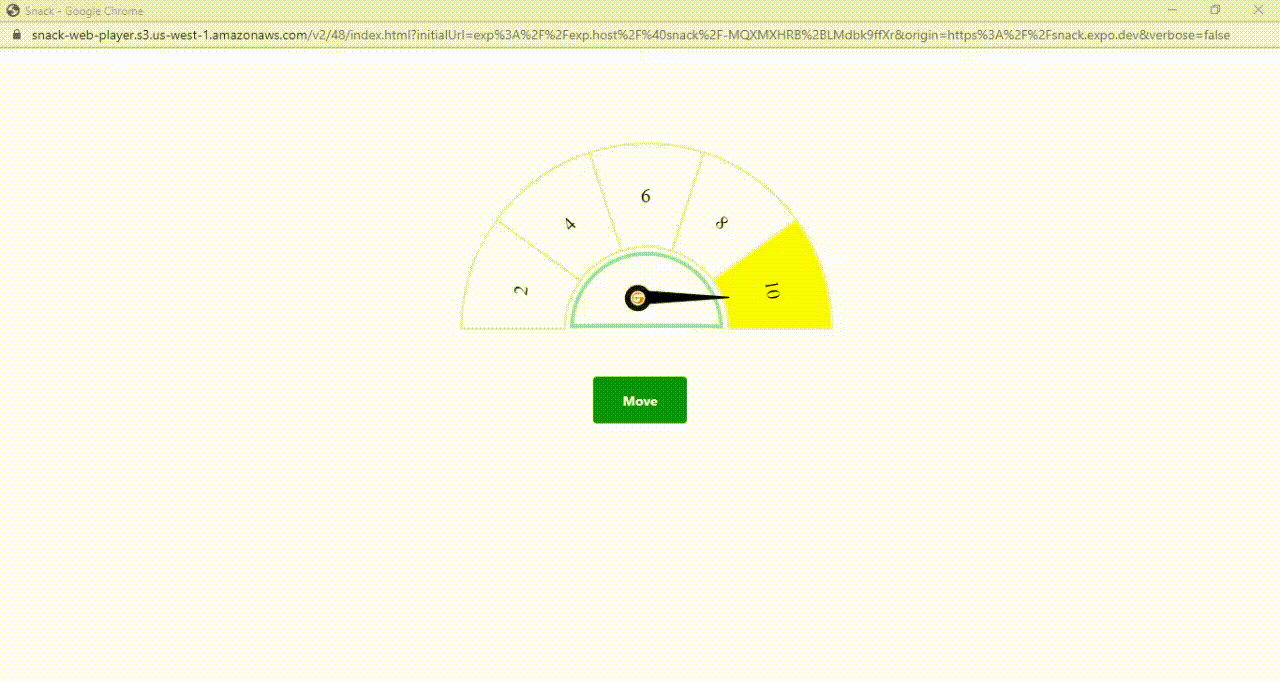
    A speedometer is a visual depiction of a value between a specific range and, often referred to as a gauge or performance meter, is frequently used to show the status or progress of an activity or process. Using the Animated API and some fundamental geometry, you can add a speedometer animation to a React Native project.

    Here is an instance of using React Native to make an easy-to-use speedometer animation or animated progress meter.

    To create the animated progress bar in React Native, refer to the instructions below:

    Step 1: Change the speedometer’s SVG component to a React NativeComponent

    We will first translate the progress meter’s SVG component into an RN component. We must separate the pointer and meter components, which can be displayed using react-native-svg before the same output can be seen in the JSX in React component library.

    Step 2: Define the Method Of Interpolation

    Following that, we shall specify the interpolation following the progress meter’s component design. Please modify the below function’s input and output ranges in light of the arrangement of your SVG component.

    const animInterpolation = progressValue.interpolate({
    inputRange: [0, 1, 2, 3, 4, 5, 6, 7, 8, 9, 10],
    outputRange: [
       '-90deg',
       '-90deg',
       '-90deg',
       '-45deg',
       '-45deg',
       '0deg',
       '0deg',
       '45deg',
       '45deg',
       '90deg',
       '90deg',
    ],
      });
    

    Step 3: Making the Needle Part of the SVG Image

    Next, using react-native-svg and code from GitHub repository, we integrate the anchoring point helper element for the needle. We need to enter the start point for the turn in the getTransform() method.

    const getTransform = () => {
    let transform = {
       transform: [{perspective: 1}, {rotate: animInterpolation}],
    };
    return withAnchorPoint(
       transform,
       {x: 0.5, y: 1},
       {width: 125, height: 150},
    );
      };
    
    {x: 0.5, y: 1} states that the rotation should occur on the mid-bottom point.


    Step 4: Add SVG Components to The Animated View

    The animation is provided through the React-Native Animated API. The needle may animate by specifying a use effect for auto-animation or using the click handler code, as seen below.

    function onButtonClick() {
    if (progressValue !== score) {
       setScore(Math.floor(Math.random() * (10 - 1 + 1) + 1));
    }
      }
    
      useEffect(() => {
    if (score > 0) {
       Animated.timing(progressValue, {
         duration: 2000,
         toValue: new Animated.Value(score),
         useNativeDriver: true,
       }).start(finished => {
         console.log('finished====', finished);
         if (finished) {
           setFillColor('#91d9ae');
         }
       });
    }
      }, [progressValue, score]);
    

    Step 5: Ultimate Design

    You can now access the GitHub repository developed, from which you may utilize the code to construct a React Native animated progress meter.

    Output

    Schedule an interview with React developers

    Conclusion

    In this article, you learned how to utilize the Animated API for constructing an animated progress meter. You can make your lively progress meters by following the instructions and you can use them to give your React Native apps a sense of life and engagement.

    Hire React developers from BOSC Tech Labs who is ready to assist you with your development requirements. Although React Native is our area of expertise, we have also worked with various platforms and technologies. If you need assistance with React Native, we will be happy to discuss your project with you and assist you.

    Frequently Asked Questions (FAQs)

    1. How does React Native use animation?

    Making an Animated.value is fundamental to the animation creation process. The value must be connected to one or more styles of certain aspects of an animated component before being used to drive updates during animations with Animated. timing(). Avoid making direct changes to the animated value. To return a mutable ref object, use the useRef Hook.

    2. What does a React Native animated event mean?

    A valuable technique for automatically setting a value on an animated is the Animated. event. An array of keys and a value are provided. This is usually used in conjunction with the onScroll or onPanResponderMove events.

    3. How do you demonstrate progress in React?

    We may include a progress bar in the React application by using the react-progress-bar component of the ranmonak NPM package. Users must enter the following command into the console for the current React application to include the Ranmonak library.

    Book your appointment now

  • Utilising the React Native Image Zoom Viewer to Implement Pinch-to-Zoom

    Utilising the React Native Image Zoom Viewer to Implement Pinch-to-Zoom

    Utilising a single codebase, developers can create mobile apps for both iOS and Android that use the widespread React Native technology. Images are one of the key components of mobile app development, and zooming is a frequently utilised feature for looking at images more closely. In this article, we’ll use the React Native image zoom viewer library (“react-native-image-zoom-viewer”) to add the pinch-to-zoom capability for photos in our React Native app.

    Introduction

    In this article, we’ll explore how to zoom in on photos in React Native applications using a react-native modal that scrolls over images. In this case, the zoom modal will be simple to reach because we intend to use it more than once.

    Prerequisites

    The following criteria must be met before continuing with this tutorial:

    • react-native-image-progress
    • react-native-fast-image
    • react-native-image-zoom-viewer

    Step 1: Importing Required Components From Libraries

    Implement the pinch-to-zoom image capability by importing the required components from the libraries listed above. To import the aforementioned components, use the following code:

    import ImageViewer from 'react-native-image-zoom-viewer';
    import Modal from "react-native-modal";
    import FastImage from "react-native-fast-image";
    import { createImageProgress } from "react-native-image-progress";
    

    Step 2: Using a Custom Image Component

    You must wrap the FastImage component with the createImageProgress function from the “react-native-image-progress” package in order to process the image and reflect the loader as it is being loaded. To enclose the FastImage component, use the following code:

    const Image = createImageProgress(FastImage)
    

    Schedule an interview with React developers

    Step 3: Create the ZoomModal Component

    The next step is to add a modal with an ImageViewer from the library React Native Image Zoom Viewer (react-native-image-zoom-viewer). We have developed a method named “renderImage,” which includes the specific FastImage component, to render the images. The ActivityIndicator component from the “react-native” package can be used for loading. For this, you can use the following code:

    const renderImage = ({ source, style }) => {
           return (
               <Image
                   source={{ uri: source?.uri, priority: 'high' }}
                   style={style}
                   resizeMode="contain"
                   indicator={renderLoading}
               />
           )
       }
    

    We may use the ActivityIndicator from react-native below for loading.

    const renderLoading = () => {
           return (<ActivityIndicator color={'white'} size={'large'} />)
       }
    

    UI Component for Image Zoom

    <Modal visible={visible} transparent={true}>
    
                <CrossIcon onPress={closeModal} />
    
                <ImageViewer
                    enablePreload={true}
                    index={currentIndex}
                    imageUrls={images}
                    useNativeDriver={true}
                    enableSwipeDown={false}
                    renderImage={renderImage}
                    loadingRender={renderLoading}
                    saveToLocalByLongPress={false}
                 />
    
      </Modal>
    

    Step 4: Use the app’s zoom modal functionality

    You can use the zoom modal in the app now that we’ve added the pinch-to-zoom feature. The pinch-to-zoom picture feature can be achieved by importing the zoom image modal into the file. For this, you can use the following code:

    <ZoomImageModal
            images={selectedImage} //Array of objects having URL of images
            isVisible={isVisible} //State for managing if the modal is open
            currentIndex={currentIndex}
            closeModal={closeZoomImageModal} // Function for closing modal
          />
    

    Conclusion

    In this article, we learnt how to use the React Native image zoom viewer library to provide picture zooming capabilities to a React Native application. By enabling users to zoom in on photos and analyse them in more depth, developers can improve the user experience by implementing the aforementioned steps. If you want to create an RN multi-media app with image zoom and other features, hire React app developer from us.

    Frequently Asked Questions (FAQs)

    1. How can an image zoom effect be made to react?

    Adding pinch-zoom and pan sub components is made possible using a React component library. You can pinch-zoom and pan the zoomed image on a touchscreen. On a desktop computer, you can “pinch” by pressing and holding the ALT key while dragging the mouse from the inner content’s centre to its edges.

    2. What happens when you zoom in on an image?

    When using an optical zoom, the lens enlarges the image such that it appears as though the objects in the image are nearer to the camera. The lens is physically extended in optical zooming to enlarge or zoom in on an item.

    3. How do React Native maps auto-zoom?

    When the list of markers is updated, send the list of ids from the identifier props in the marker to the fitToSuppliedMarkers function to automatically zoom the list of markers in the MapView.

    4. Zoom utilises React Native?

    The Zoom Video SDK for React Native is an iOS and Android wrapper for the Zoom Video SDK. The Zoom Video SDK capabilities can be incorporated into your React Native iOS and Android apps using the high level components, classes, and utilities provided by this library.

    Book your appointment now

  • An Comprehensive Guide: React Admin Pannel

    An Comprehensive Guide: React Admin Pannel

    Today we’re going to talk about a really cool tool for building admin interfaces called React-admin.

    If you’re familiar with React, you’ll know that building admin interfaces can be a real pain. There’s a lot of boilerplate code involved, and it can take a lot of time to get everything up and running.

    That’s where React-admin comes in. It’s a framework that provides a set of pre-built React components libraries for building admin interfaces, so you can get up and running quickly without having to write a bunch of code.

    One of the things I love about React-admin is how customizable it is. You can easily tweak the look and feel of your admin interface to match your brand, and you can even add your own custom components if you need something that’s not already provided.

    Another great thing about React-admin is how easy it makes it to work with data. You can connect it to any REST API, and it will automatically generate forms and tables based on the data you provide. As a result, you can focus more on your actual business logic and spend less time creating code.

    Overall, I think React-admin is a fantastic tool for anyone who needs to build an admin interface quickly and easily. It’s well-documented, easy to use, and highly customizable. Try it out and inform me what you think about it!

    In this article, we will explore the features of React-admin and how it can be used to create an admin interface for your application.

    React-admin: What is it?

    An open source framework called React-admin creates admin interfaces by leveraging REST, GraphQL, or bespoke React APIs. Due to the fact that React-admin offers a selection of pre-made UI components based on Material-UI, we also don’t need to bother about style formatting.

    Advantages of React-admin

    React-admin may be tailored to the demands of the web application, offering flexibility and control while giving a top-notch UX. Common admin panel functionalities included in React-admin include the following:

    1. Data management:

    React-admin offers a straightforward method to manage data. With it, CRUD operations, filtering, sorting, and pagination may be carried out with minimal code.

    2. UI customization:

    React-admin has pre-built UI components that may be customised with Material-UI or CSS to meet your needs.

    3. Development is Streamline:

    The development is made easier because of React-admin’s guessers, which create reusable components using the properties and data from your API.

    4. Identification and Authorization:

    React app Developers may quickly control user access to the admin panel with React-admin.

    5. (i18n) Internationalisation:

    React-admin includes built-in internationalisation support for React apps, making it simple to build an admin panel that supports many languages.

    Features of React-admin

    1. Data Providers

    React-admin supports various data providers such as REST, GraphQL, and custom data providers. Data Providers are used to fetch data from the server and provide it to the React-Admin components.

    2. Localization

    React-Admin provides built-in localization support, allowing you to easily translate your application into multiple languages.

    3. Plugins

    React-Admin provides a plugin system that allows you to extend the functionality of the library. There are various plugins available for React-Admin, including custom inputs, custom actions, and custom layouts.

    Schedule an interview with React developers

    How to use React-admin

    Using React-admin is simple and straightforward. Here are the steps to get started

    Step 1: Install React-Admin

    Step 2: You can install React-Admin using npm or yarn

    npm install react-admin   or       yarn add react-admin
    

    Step 3: Choose a Data Provider
    React-Admin supports various data providers such as REST, GraphQL, and custom data providers. Choose a data provider that works best for your application.

    Step 4: Configure Data Provider
    Once you have chosen a data provider, you need to configure it to work with React-Admin.

    Step 5: Create Resource Components
    Resource Components are used to define the data model and specify how it should be displayed in the UI. Resource Components are also used to specify the data provider for the resource.

    Step 6: Create the Admin Component
    The Admin Component is the main component of the admin interface. It is responsible for rendering the Resource Components and providing the data provider to the components.

    Here is a simple example of using React-Admin to create an admin interface

    import React from 'react';
    import { Admin, Resource } from 'react-admin';
    import dataProvider from './dataProvider';
    import {
      TopicCreate,
      TopicEdit,
      TopicList,
      TopicShow,
    } from "./pages/topic/Topics";
    import TopicIcon from "@mui/icons-material/Topic";


    const App = () => (
        <Admin dataProvider={dataProvider}>
            <Resource
                name="topic"
                list={TopicList}
                edit={TopicEdit}
                create={TopicCreate}
                show={TopicShow}
                icon={TopicIcon}
              />
        </Admin>
    );
    export default App;
    

    In the above example, we are creating an admin interface for a application. We are defining a Resource Component for the ‘topic’ resource and specifying the list, edit, and create components for the resource.

    Conclusion

    In conclusion, React Admin Pannel provides an outstanding framework for creating back-office apps and administrative interfaces using React. It is a useful tool for developers wishing to develop effective and scalable dashboards because to its pre-built components, data management features, extensibility, and code organisation principles. React Admin will speed up your development process and assist you in producing reliable and intuitive apps, regardless of whether you need to manage huge amounts of data or create advanced user interfaces.

    If you want to develop a React app for your company, get in touch with a developer from www.seo.bosctechlabs.net, who can help with your project and ensure that the app is completely within your budget.

    Frequently Asked Questions (FAQs)

    1. What distinguishes React and React-admin from one other?

    React is a package that represents the V “view” in the MVC architecture and enables you to create web apps based on the component notion. Built using React, React-Admin is a web framework for B2B apps.

    2. What drawbacks does React-admin have?

    The inability to utilise a React admin template for a front-end framework is one of its main drawbacks. While react administration templates are often one size fits all, a front-end framework has to be significantly customised for each unique company.

    3. Why we use React-admin?

    React-admin utilises an adapter strategy and an idea known as Data Providers. You may create your own Data Provider to query an existing API, or you can utilise current providers as a model when creating your own API. It takes only a few hours to write a unique Data Provider.

    Book your appointment now

  • Exploration of String Literals in React Applications

    Exploration of String Literals in React Applications

    String literals are crucial for representing and manipulating textual data in React applications. Understanding and successfully using string literals is vital for React app experts to create dedicated and flexible React apps, whether for displaying dynamic information, producing HTML markup, or managing language translation. This article explores the idea of string literals inside the React framework, emphasizing their importance and offering real-world applications.

    What do String Literals work?

    In computer programming, string literals are collections of characters that are encapsulated in single (‘) or double (“) quotation marks. String literals are frequently used in React to interpolate dynamic data into text strings or to represent static text content.

    import React from 'react';
    
    const App = () => {
      return <h1>Hello World!</h1>;
    }
    
    export default App;
    

    The static text content produced as an <h1> element in the code mentioned above is represented by the string literal “Hello World!” String literals in React components make it easy to define and display static text.

    Interpolate Dynamic Values

    String literals are considerably more potent when they are used to interpolate dynamic values into text strings. React components must often show data that changes based on state or props. Here is an illustration showing how to interpolate dynamic values using string literals:

    import React from 'react';
    
    const Welcome = ({ name }) => {
      return <p>Welcome, {name}!</p>;
    }
    
    export default Welcome;
    

    The value of the name prop supplied to the Welcome component is substituted for the placeholder “name” within the string literal in this line of code. Given the provided name prop, this enables the React component to display personalized greetings dynamically.

    Multiline Text

    React also supports multiline text using string literals, making composing and displaying lengthier text blocks inside components simpler. Here’s an illustration:

    const Details = () => {
      return (
        <div>
          <h2>Heading</h2>
          <p>
            Lorem ipsum dolor sit amet,
            consectetur adipiscing elit, sed do eiusmod
            tempor incididunt ut labore et dolore magna aliqua.
          </p>
        </div>
      );
    };
    
    export default Details;
    

    In this illustration, the paragraph text is represented as a multiline string literal, making the code structure easier to understand and maintain.

    Internalization and Localization

    String literals are essential for managing localization and internationalization in React apps. Text strings may be defined as string literals, making switching out translations or adding support for multiple languages more straightforward. String literals may be combined with various libraries and tools, such as react-i18next, to support localization efforts.

    import React from "react";
    import { useTranslation } from "react-i18next";
    
    const Welcome = ({ name }) => {
      const { t } = useTranslation();
      return (
        <div>
          <p>{t("Welcome")}</p>
        </div>
      );
    };
    
    export default Welcome;


    The translated string for the key ‘Welcome’ is obtained in this example using the t function from the useTranslation hook. The translation for each language may be specified independently, guaranteeing that the appropriate localized string is shown depending on the user’s preferred language.

    Schedule an interview with React developers

    Conclusion

    The essential building block of React applications for displaying and modifying textual data is the string literal. Understanding correctly using string literals in React enables React developers to develop flexible, localized, and dynamic user interfaces, whether for rendering static text, interpolating dynamic values, managing multiline content, or enabling translation. Programmers may create engaging and scalable React apps that meet various text-based needs using string literals’ power.

    Connect with a trustworthy React app development company like BOSC Tech Labs to grasp the React framework because they will assist you with the necessary strategies and approaches.

    Frequently Asked Questions (FAQs)

    1. What does a string literal represent?

    A string literal is a group of characters from the source character set that are enclosed in double quotation marks(” “). Characters that collectively make up a null-terminated string are represented using string literals.

    2. What differentiates a string from a string literal?

    A string variable is a designated memory location that refers to a string value that may be altered during runtime, as opposed to a string literal, which is a sequence of characters directly placed in the code.

    3. Do string literals produce objects?

    The new() operator always generates a new object in heap memory when creating a String object. A pre-existing object from the String pool may be returned if we build an object using the String literal syntax, such as “Baeldung,” on the other hand.

    Book your appointment now

  • How to Use the React Redux Toolkit?

    How to Use the React Redux Toolkit?

    A strong library called React Redux Toolkit makes it easier to create Redux apps. It offers a collection of standards and utilities that streamline and speed up Redux development which is easy and simple for React developers. In this article, we’ll look at the fundamentals of the React Redux Toolkit and how it can make your Redux process more efficient.

    What is React Redux Toolkit?

    A description of the React Redux Toolkit and how it makes Redux development simpler.
    A description of the main components of the React Redux Toolkit, including the configureStore function, createSlice for reducer logic, and createAsyncThunk for asynchronous action processing.

    What Makes Redux Toolkit Useful?

    The preferred method for creating Redux logic is to use the Redux Toolkit package.
    Redux Toolkit makes it simpler and quicker to write Redux. We must declare the state, reducer, and action individually in common Redux. In Redux Toolkit, however, we describe it collectively inside createSlice. It is simpler and easier to understand. Redux Toolkit is faster than regular redux since less React boilerplate code has to be written.

    Using the React Redux Toolkit to Create a Redux Project

    A step-by-step tutorial for installing the React Redux Toolkit on a fresh React project.

    Instructions for installing the required dependencies

    Modifying the setup options and configuring the Redux store using the configureStore function.

    Creating Slices with createSlice

    The idea of slices, which include reducer logic and action producers, is introduced.
    An explanation of how to use createSlice to create a slice and define its initial state and reducer functions.

    An explanation of how createSlice uses the specified reducer functions to construct action creators and action types automatically.

    Dispatching Actions and Accessing State

    Demonstration of using the useDispatch hook to dispatch actions from React components.
    using the useSelector hook to retrieve and use state from the Redux store in components.

    Handling Asynchronous Actions with createAsyncThunk

    Overview of createAsyncThunk’s asynchronous action handling capabilities.
    Using createAsyncThunk, an example of defining and sending an asynchronous operation.

    Managing Entities with Redux Toolkit

    The React Redux Toolkit introduces the createEntityAdapter function for handling normalized data.
    An example of how to create entity adapters and interact with entities using the CRUD method.

    Advanced Redux Toolkit Features

    Discussion of additional features offered by React Redux Toolkit, such as middleware setup, immutability with the immer library, and testing utilities.

    How to setup Create-React-App With Redux

    Let’s start by setting up a fresh React application with CRA for this Redux tutorial:

    	
    npm install -g create-react-app
    create-react-app redux-tutorial
    cd redux-tutorial
    

    We’ll add redux after that with:

    	
     npm install --save react-redux @reduxjs/toolkit
    

    Firstly configure store. Create file src/store/index.js containing:

    	
    import { configureStore } from '@reduxjs/toolkit'
    import { combineReducers } from 'redux'
    const reducer = combineReducers({
      // here we will be including reducers
    })
    const store = configureStore({
      reducer,
    })
    export default store;
    

    Instead of taking several function parameters, configureStore only takes one object. It’s because some Redux middleware has been included by default and the store has been set up to allow utilizing the Redux DevTools Extension.

    Next, we must link our website with the React application. Import it into index.js like this:

    	
     import { Provider } from 'react-redux'
    import store from './store'
    ReactDOM.render(
      <Provider store={store}>
        <App />
      </Provider>,
      document.getElementById('root')
    )
    

    Schedule an interview with React developers

    How To Structure Your Redux?

    Let’s now construct the simple login form and logout button displayed after authentication using Redux authentication. The organisation of the folders and files in your application is irrelevant to Redux itself. However, it is typically simpler to maintain that code when the logic for a given feature is co-located in a single location. Instead of dividing logic across several folders by “kind” of code, Redux.org advises that most applications should arrange files using the “feature folder” technique (all files for a feature in the same folder) or the “ducks” pattern (all Redux logic for a feature in a single file) (reducers, actions, etc).

    Let’s add src/store/user.js store slice:

    	
    import { createSlice } from '@reduxjs/toolkit'
    // Slice
    const slice = createSlice({
      name: 'user',
      initialState: {
        user: null,
      },
      reducers: {
        loginSuccess: (state, action) => {
          state.user = action.payload;
        },
        logoutSuccess: (state, action) =>  {
          state.user = null;
        },
      },
    });
    export default slice.reducer
     
    // Actions
    const { loginSuccess, logoutSuccess } = slice.actions
    export const login = ({ username, password }) => async dispatch => {
      try {
        // const res = await api.post('/api/auth/login/', { username, password })
        dispatch(loginSuccess({username}));
      } catch (e) {
        return console.error(e.message);
      }
    }
    export const logout = () => async dispatch => {
      try {
        // const res = await api.post('/api/auth/logout/')
        return dispatch(logoutSuccess())
      } catch (e) {
        return console.error(e.message);
      }
    }


    Conclusion

    Redux development is made easier with the help of the React Redux Toolkit, which makes it more effective and accessible. Utilizing its features, like createSlice, createAsyncThunk, and configureStore, allows you to write less boilerplate code and concentrate more on developing the functionality of your application. Additionally, some of the complexity involved in implementing Redux in our React application is reduced by using the Redux Toolkit. Repetitive code is not necessary. Discover how to React Redux Toolkit enhances your Redux workflow and boosts productivity by taking the time to explore and experiment with it.

    If you need more support and assistance with the React Redux toolkit, you can contact BOSC Tech Labs.

    Frequently Asked Questions (FAQs)

    1. What does React’s Redux Toolkit do?

    The preferred method for creating Redux logic is to use the Redux Toolkit package. It was first developed to assist in addressing three frequent worries regarding Redux: “Setting up a Redux store is too difficult.”

    2. What distinguishes Redux from the Redux Toolkit?

    A JavaScript package called Redux is used to control the application state. Although it works nicely with React, it may also be utilised with other JavaScript frameworks. The Redux Toolkit is a collection of tools that makes Redux development easier.

    3. Can I use the Redux toolkit with React query?

    While Redux Toolkit Query and React Query have certain similarities, Redux Toolkit Query has one major benefit over React Query: when combined, they provide a comprehensive data fetching and state management solution for React apps.

    Book your appointment now

  • What Is React Native AsyncStorage and How to Use It?

    What Is React Native AsyncStorage and How to Use It?

    React Native application, find out how to create this asynchronous and global key-value storage system. Learn here all about React Native AsyncStorage.

    Data persistence and storage in a React Native app are made simple with React Native AsyncStorage. Without relying on the device’s local storage or complicated storage systems, you may manage basic scenarios of little data in your app with the help of the AsyncStorage API.

    What Is React Native AsyncStorage?

    A persistent key-value storage system is provided via the AsyncStorage API. The JavaScript data types supported by the API are string, boolean, numeric, and JSON objects.

    When using AsyncStorage, the data remains persistent and accessible even if the app is closed or the device is restarted. For data caching and storing minimal quantities of application state, AsyncStorage is the best storage option.

    What Issue Does AsyncStorage Address?

    Prior to AsyncStorage, effective data caching was a difficult effort. Either local storage, which loses data when the application shuts down, or a relational database management system (RDBMS) are options for data storage. However, they are too complicated to work in our particular scenario.

    These issues are resolved by AsyncStorage, with the skills of React developers who gives React Native applications a quick, dependable way to store small amounts of temporary data.

    Data must first be serialised into a JSON string before being stored with AsyncStorage. The JSON string is subsequently kept in a key-value database. Data is deserialized from JSON and given back to you in its original format when you try to get it from AsyncStorage.

    These applications are asynchronous and do not interfere with the main JavaScript thread. This makes it perfect for storing information that needs to be accessed frequently, such user settings and application state.

    Using AsyncStorage

    Run the following command in the terminal of your project to install the react-native-async-storage package:

    npm install @react-native-async-storage/async-storage
    

    AsyncStorage’s methods do not instantaneously return results because of its asynchronous nature. Instead, they provide back a promise that resolves after the whole process is finished.

    When invoking AsyncStorage methods, you must use the async/await syntax or an equivalent method.

    Use the setItem() and multiSet() Methods to Write Data

    The values for the specified key are set using the setItem() and multiSet() methods. The key and the values are accepted as parameters by these methods.

    If the operation was unsuccessful, the method would reject with an error, returning a promise that resolves with a boolean value instead:

    // Save a value for the key "user"
    await AsyncStorage.setItem('user', 'john');
    
    // Save multiple values for the key "user"
    await AsyncStorage.multiSet(['user', 'john', 'doe']);
    

    Use the getItem() and multiGet() Methods to Read Data

    Using the key for the desired value, you can retrieve stored data from the storage using the getItem() method. The promise rejects with an error if the passed key does not exist.

    const name = await AsyncStorage.getItem('user');
    

    getItem() returns a string as its value. Use JSON.stringify() to turn the data into a string before storing it if you need to store it in a different format. When getting the string, use JSON.parse() to convert it back to the original data type.

    // Save the object {name: "John Doe", age: 30} for the key "user"
    await AsyncStorage.setItem('user', JSON.stringify({name: "John Doe", age: 30}));
    
    // Get the object for the key "user"
    const user = JSON.parse(await AsyncStorage.getItem('user'));
    

    The multiGet() function can also be used to retrieve multiple key-value pairs. The method will require a string-only array of keys.

    Using the mergeItem() and multiMerge() Methods to Combine Data

    The given value and the current value for the given key are combined using the mergeItem() and multiMerge() methods. Any kind of data can be the value supplied to mergeItem(). AsyncStorage does not encrypt the data, therefore anyone with access to the device can read the data, which is something to keep in mind:

    await AsyncStorage.mergeItem('name', 'Jane Doe');
    

    mergeItem() requires the key for the value you would like to merge as well as the new value that you wish to combine with the key’s current value. To merge many items to a key value, use the multiMerge() function.

    Simple Storage Making use of the clear() Method

    You can delete all of the AsyncStorage items using the clear() method. It can be helpful in a variety of situations, such as when you need to remove cached data from your mobile device or reset the state management of the React app depending a user log-out.

    const clearData = async () => {
      try {
        await AsyncStorage.clear();
     
      } catch (e) {
        console.error(e);
      }
    };
    

    The code shown above will remove all key-value pairs kept in AsyncStorage.

    Additionally, you may instruct clear() to call a callback function that will be used after the procedure is finished.

    AsyncStorage.clear()
      .then(() => {
        // Clear operation completed
       
      })
      .catch((error) => {
        console.error(error);
      });
    

    The data stored in AsyncStorage will all be completely deleted if you use the clear() method.

    Data Caching Using AsyncStorage

    The development of mobile apps frequently uses data caching to enhance performance and minimise network requests. You may quickly cache data in React Native apps with AsyncStorage.

    Data is first checked to see if it is already in the cache when you access it. If so, the cache is used to retrieve the data. If not, the programme fetches the information from the more long-term repository and adds it to the cache. The data will be returned from the cache the following time you browse it.

    Let’s say you have a mobile app that shows a list of books that was retrieved from an API. You can use AsyncStorage to cache the downloaded book data to improve efficiency.

    Here is how it might be done as an illustration:

    const [books, setBooks] = useState([]);
    
    useEffect(() => {
        const fetchBooks = async () => {
          try {
            // Check if the cached data exists
            const cachedData = await AsyncStorage.getItem('cachedBooks');
    
            if (cachedData !== null) {
              // If the cached data exists, parse and set it as the initial state
              setBooks(JSON.parse(cachedData));
            } else {
              // If the cached data doesn't exist, fetch data from the API
              const response = await fetch('https://api.example.com/books');
              const data = await response.json();
    
              // Cache the fetched data
              await AsyncStorage.setItem('cachedBooks', JSON.stringify(data));
    
              // Set the fetched data as the initial state
              setBooks(data);
            }
          } catch (error) {
            console.error(error);
          }
        };
    
        fetchBooks();
      }, []);
    

    In the following example, you retrieve the book data using the useEffect hook. Call AsyncStorage.getItem(‘cachedBooks’) to see if the cached data is present in the fetchBooks function. Use JSON.parse the cached data if it is there.Use setBooks to parse and set it as the default state. This enables you to instantly show the stored data.

    Use the fetch() function to get the data from the API if the cached data is missing. Cache the data by using AsyncStorage.setItem() after it has t. After that, make the fetched data the initial state to guarantee that it will be shown in future renderings.

    Now, you may see the cached books like follows:

    import React, { useEffect, useState } from 'react';
    import { View, Text, FlatList } from 'react-native';
    import AsyncStorage from '@react-native-async-storage/async-storage';
    
    const App = () => {
      return (
        <View>
          <Text>Book List</Text>
          <FlatList
            data={books}
            keyExtractor={(item) => item.id.toString()}
            renderItem={({ item }) => (
              <View>
                <Text>{item.title}</Text>
                <Text>{item.author}</Text>
              </View>
            )}
          />
        </View>
      );
    };
    
    export default App;
    

    The cached data will be displayed without requiring further API requests on subsequent app launches or screen reloads.

    React Native AsyncStorage provides a potent solution for data storage and retrieval. Using it for dynamic data loading. Through the use of caching, performance is improved and faster access to stored data is given.

    You can dynamically load and show data in your React Native app by combining your understanding of AsyncStorage with strategies like custom pagination. This will make it possible to handle huge datasets effectively.

    Schedule an interview with React developers

    Conclusion

    We have now seen the many ways that AsyncStorage provides, along with instructions on how to use each method and an example use case. Hopefully, this article has made AsyncStorage for React Native more understandable. If you’re looking for expert mobile app development services, consider partnering with a leading mobile app development company in the USA. Their experienced team can help you leverage technologies like AsyncStorage and create high-quality, robust applications that meet your business needs. Thank you for reading!

    Frequently Asked Questons (FAQs)

    1. How to use asyncstorage in React Native?

    React Native AsyncStorage is an easy, unencrypted, permanent, and asynchronous storage system that stores data across the whole app. A key-value pair is used to store data in this system. AsyncStorage operates worldwide, hence React Native advised using abstraction on top of it rather than AsyncStorage directly.

    2. Why to use async in React?

    A promise-based library called React Async provides a declarative API for making API calls. To support declarative promise resolution and data retrieval, it offers a React component and a React Hook. Nearly all data fetching frameworks and APIs, such as Fetch API, Axios, and GraphQL, are compatible with React Async.

    3. What makes async and await different from one another?

    A function can be made to appear asynchronous by using the async keyword. The await keyword delays the beginning of the code block of the async function until a promise is accepted or denied.

    Book your appointment now

  • How Future Mobile App Development Will Be Affected by React Native and Flutter?

    How Future Mobile App Development Will Be Affected by React Native and Flutter?

    The handling of components is where these two frameworks most significantly differ. ReactJs transforms them into JavaScript components, whereas Flutter handles them using the basic canvas produced by Dart for Future Mobile App Development.

    Overall, both frameworks offer complete services that can support the creation of cross-platform applications. Since the introduction of Flutter and React Native, developers have had the ability to speed up the creation of simple apps, research product-market fit, and produce MVPs that can be used for validation.

    When developing ideas that are interesting to the correct audience, there is a sense of relief. These frameworks have promoted innovation and improved app idea interfaces.

    The frameworks, according to developers, are what will shape the development of mobile applications in the future. We’ll examine a few development trends that imply Flutter and React Native will have a major influence on mobile app development.

    How Will Future Mobile App Development Be Affected by React Native & Flutter?

    The cutting-edge technologies and trends that appear to be changing the world of mobile app development can be embraced with the aid of cross-platform frameworks.

    1. Adopting AI

    Since AI is the future, many companies are prepared to adopt it. Several apps need to use technology to boost intelligence and give the app more power. AI-powered apps, for instance, can offer recommendations, improve decision-making, and provide immediate support.

    Additionally, it might help the company’s marketing and sales efforts. A crucial component of AI that your company should take into account is chatbots. It can boost lead creation, conversational marketing, and generating profits for your company.

    It could be expensive for you to independently implement AI in different native apps. Before you accept artificial intelligence, it can even take some time. The cross-platform frameworks continuously strive to lessen the developer’s workload. They have built-in solutions that can make the implementation better.

    The developers can concentrate on figuring out which AI components need to be included in the app.

    2. Security Factors

    Businesses now need to ensure that their app development meets security requirements as data breaches continue to disrupt daily operations. More consumers will utilize your safe app if it assures stability.

    You would be able to debug problems more quickly while working with a single codebase, as is the case with Flutter and React Native. As a result, programmers would have more time to design programs with security in mind. You will have more time to identify the security problems and potential fixes.

    Finally, each framework has its own unique set of security implementation best practices. They already know how to put the best security formats into practise. A stunning application that is completely secure can be created, provided the documentation is followed. Cross-platform frameworks can also help with the current trend.

    3. On-demand App Solutions

    It is now crucial for people to have access to on-demand solutions as they become more aware of mobile applications. Numerous on-demand options exist. Each of these apps simultaneously has loopholes that need to be filled. Cross-platform frameworks might be considered if you’re planning to create MVPs or straightforward programs that can help with on-demand solutions.

    Your needs for an on-demand app ideas will be supported by both React Native and Flutter. Depending on your needs for functionality, feature requirements, and other factors, you can choose the framework. When a company offers an on-demand application, they frequently see an increase in conversions and usage.

    4. Mobile Payments and Wallets

    The Fintech sector has experienced rapid expansion in recent years. Numerous wallets, payment methods, and technological advancements are enabling this market to grow significantly.

    It’s time for the sector to expand a little bit more, and right now, it appears to be the most popular mobile app development trend. In this section, you have a number of gaps and open possibilities. You can guide your company towards possible conversions if you can grasp on these opportunities.

    Cross-platform development can assist in popularising the concept. It can also assist you in immediately starting your fintech concepts.

    Your application can be constructed using a variety of features and built-in components. Additionally popular and supported by a large community, cross-platform frameworks can help you provide on-demand services of the necessary standard.

    5. Mobile Business

    Using mobile has become crucial for enterprises. The eCommerce market is the same. Many companies think an app will help them reach customers and increase conversions.

    If the trend is moving upward, the programmers must hurry up the pace and begin presenting practical solutions. Using frameworks created for mobile commerce development makes this possible.

    For ideas involving mobile commerce, Flutter, and React Native can provide a wide range of front-end solutions. You’ll see that they can contribute to the delivery of aesthetically pleasing and useful interfaces that enrich experiences. These mobile app development frameworks might be useful whether you want to make a basic category or something more complicated.

    Schedule an interview with React developers

    Mobile app development in the future: Flutter and React Native

    We recently witnessed how they can assist companies in managing current trends and creating apps that are tailored to their needs. Here are a few reasons why frameworks are the way mobile app development will go in the future.

    1. Increases Productivity of Developers

    It is not a developer’s responsibility to provide solutions. They must also be innovative and provide comprehensive solutions that cater to the needs of the user. The developer might have less time for innovations if they spend all of their time coding and fixing bugs.

    Cross-platform frameworks like React Native and Flutter keep improving so they can build up a large library of components. This will make the engineer’s idea come to fruition more quickly. To create the app, they can use every component. They would eventually spend more time ideating the app and less time on actual development.

    2. Significant Popularity

    We cannot dismiss the fact that both framework communities are expanding. More programmers are contributing to the framework’s patching effort by broadening the library and improving the capabilities.

    The leading technological giants Google (Flutter) and Facebook (React Native) support the frameworks. We also cannot ignore their communities. You may observe more instances of developer-friendly technologies being added to frameworks that help in mobile app development as a result of the developing communities.

    3. Constant Improvement

    Google recently unveiled Flutter 3.10, which provides developers with a more reliable development environment. In order to create a more futuristic product, the two frameworks are constantly adding components that can be helpful in providing the necessary solutions.

    These technologies can be incorporated and the solutions may be created with the aid of built-in ML libraries and ARKits. Each upgrade features a user interface that is easier for coders to use and that walks them through front-end development. The frameworks will provide in-depth futuristic solutions as they become more future-ready.

    4. A single codebase

    Using these frameworks expands a single codebase, which is one of their main benefits. This means that when testing the application or improving its quality, you won’t need to work with two or more codebases. This indicates that using a single codebase makes debugging quicker and simpler. You only have to deal with one UI when using Flutter.

    The developer’s task is made simple and quick by this. In terms of performance and speed, it is also futuristic. Since they can produce the code more quickly, it supports the developer in balancing quality and speed.

    Schedule an interview with WordPress developers

    Conclusion

    The answer is yes if you’re wondering if Flutter and React Native will still be useful in 2023. They prioritize development speed, quality, and delivery due to a large community, a single codebase, and continuous development.

    These frameworks are essential for coders since they enable the addition of cutting-edge technology and improve development overall.

    It makes sense to collaborate with the top cross-platform app development company. They can assist you find the best team and suggest the tech stack as well as the engagement approach to develop an outstanding application.

    Frequently Asked Questions (FAQs)

    1. Does the development of mobile apps have a future?

    Mobile app development has a bright future and a lot of possibilities. Developers now have the resources necessary to produce really new and transformational mobile apps that have the potential to alter the way we live and work owing to the rise of AI and ML, cross-platform development, progressive web apps, the Internet of Things, and 5G.

    2. Which is future React Native or Flutter?

    React Native can reach the same performance as an iOS app without requiring any changes to the iOS build parameters, making it in practice as quickly as pure native apps. Once your project has been developed, Flutter’s built-in Ahead-of-Time compiler will generate optimized code for both iOS and Android.

    3. Does Flutter have a future scope?

    A wonderful developer experience, native-like performance, an intuitive programming style, quick development times, and customisable widgets are all features of this framework. These characteristics make this framework a more popular option for Flutter app developers, and it is expected that demand for Flutter will increase in the years to come.

    4. What will be React Native future?

    Since its development framework is user-friendly, React Native has a bright future. Since React Native is powered by JavaScript, most programmers who are familiar with that language find using it to be rather simple.

    Book your appointment now

  • Enhancing React Native Accessibility in Mobile Apps

    Enhancing React Native Accessibility in Mobile Apps

    The mobile application development market is running based on user preferences worldwide. As the trend evolves, the priorities of client changes. Among them, the React Native accessibility is being accessed by the React developers to accept this evolution. In this blog, we will cover all the aspects of React Native Accessibility that have features and also helps the business to deliver great results and accessibility for its end users.

    Introduction

    Accessibility means accessing something. The term has existed for a long time but has become important when mobile app development goes above and beyond the programming language. However, accessibility also concentrated on the physically impaired users who can not use technological advancement in the mobile app development marketplace. A development team and business owners have also realized the significance of accessibility. Hence, introducing accessibility options like screen readers, navigators, and voice enhancements enables the niche audience to take advantage of tech stacks.

    React Native Accessibility contributes significantly to developing apps with multiple functionalities for a physically impaired audience. Android or iOS or any other platform with accessibility options such as voiceover in iOS and Talkback in Android to implement apps. Thus, React Native has complementary APIs that allow you to accommodate all users worldwide.

    React Native Accessibility Evolution

    There has been a significant increase in the accessibility of React Native after its existence in the app development field. The product and business owners realize their responsibility towards society and will build mobile apps for users with various accessibility requirements. Hence, over time React has introduced many features, which have been described below:

    1. Accessibility API

    Allows the developer to access and modify accessibility data for components with accessibility labels, traits, and hints.

    2. Tools for Auditing

    Various tools can help you to audit the accessibility of React Native apps. It has a scanner in an audio studio, which aids in identifying accessibility problems on which you must keep an eye.

    3. Customizable Settings

    It delivers API for customizing accessibility settings like font size and color contrast which supports improving the accessibility of an app for users with disabilities.

    4. Focused Testing

    Utilise assistive technology, such as screen readers, magnifiers, and voice commands, to evaluate the accessibility of a React Native app. It ensures the accessibility of the app for users with multiple accessibility needs.

    5. Inbuilt Accessible Components

    React Native has in-built accessibility components like buttons, input, images, and text component in React Native, which you can use to develop user interfaces.

    6. ARIA Support

    An ARIA specification will deliver a procedure to develop accessible web content by identifying elements’ roles, properties, and states.

    7. Guidelines

    A guideline for React Native experts has W3C’s Web Content Accessibility Guidelines and Apple’s Human Interface Guidelines that give best practices for developing accessible mobile apps.

    8. Gesture Recognition

    Used to deliver alternative methods for the users to interact with apps like double taps or swipe gestures.

    React Native Accessibility: Properties

    Accessibility properties improve the accessibility of mobile apps for users with disabilities by giving data about UI elements to assistive technologies such as screen recorders. A variety of accessibility attributes granted by React Native will improve the accessibility of mobile apps.

    1. accessibilityHint

    Delivers additional info to users about acting on the accessibility element when it is not apparent from the accessibility label alone. Also, it supports users with disabilities to understand an element’s objective and see how it can interact to achieve a specific result.

    2. Accessible

    The accessibility element property is set to be true, and it signifies that you can easily access a display with assistive technologies. It also groups the children’s view into only one selectable component. Unless otherwise specified, touchable items become accessible by default.

    3. accesiblityRole

    React Native conveys the component’s purpose to users relying on assistive technologies.

    4. accesiblityLabel

    React Native gives the label that tells UI components to the assistive technologies. Hence, by setting the accesiblityLabel property, programmers can ensure that screen readers will determine UI elements, like buttons, and interact with users. It also enables app users to understand the objective of the Ui element by giving them a more accessible and inclusive user experience.

    5. accesiblityActions

    Invokes the actions of the component programmatically. To provide accessibility activities, a component must accomplish two things:

    • Define a list of actions that are supported via an accesibilityActionsproperty.
    • Integrate the onAccessibiltyAction function for handling an action request.

    6. accesiblityValue

    The value property of the component will represent its initial value. It consists of the textual representation of value or components like a progress bar and sliders with a range, which contains information on maximum, minimum, and current values.

    Features in React Native Accessibility

    React Native has multiple tools and techniques that permit coders to develop mobile applications accessible to users. It caters to a colossal audience that has the one with disabilities and thereby delivers a better user experience for all with improved accessibility and inclusivity. Let’s see some of the features below:

    1. AccessibilityProps

    Refer AccessibilityProps as a Prop that allows experts to give extra information regarding the UI components to access services. Let’s see an example of how to use AccessibilityProps in React Native component.

    import React from 'react';
    import { Text, View } from 'react-native';
    
    const MyComponent = () => {
      return (
        <View>
          <Text
            accessible={true}
            accessibilityLabel="Hello World"
            accessibilityHint="This is a greeting message"
            accessibilityRole="header"
            accessibilityState={{ selected: true }}
          >
            Hello World
          </Text>
        </View>
      );
    };
    
    export default MyComponent;


    2. AccessiblityInfo

    React Native API gives the info related to device accessibility settings. It functions irrespective of whether the screen reader or a user will enable the larger text magnifier. Also, developers can adjust their app’s behavior according to accessibility settings. Let’s see the following example.

    import React, { useState, useEffect } from 'react';
    import { Text, View, AccessibilityInfo } from 'react-native';
    
    const MyComponent = () => {
      const [isScreenReaderEnabled, setIsScreenReaderEnabled] = useState(false);
    
      useEffect(() => {
        const getAccessibilityInfo = async () => {
          const screenReaderEnabled = await AccessibilityInfo.isScreenReaderEnabled();
          setIsScreenReaderEnabled(screenReaderEnabled);
        };
    
        getAccessibilityInfo();
      }, []);
    
      return (
        <View>
          <Text>
            {isScreenReaderEnabled
              ? 'Screen reader is enabled'
              : 'Screen reader is not enabled'}
          </Text>
        </View>
      );
    };
    
    export default MyComponent;
    

    3. Accessibility Component

    In React Native, it wraps the UI components and makes them accessible to users. It will set accessibility props depending on the device’s accessibility settings. Let’s see the code snippet example below.

    import React from 'react';
    import { Text, View, AccessibilityInfo } from 'react-native';
    
    const MyComponent = () => {
      const updateAccessibilityState = (isEnabled) => {
        AccessibilityInfo.setAccessibilityFocusEnabled(isEnabled);
      };
    
      return (
        <View>
          <AccessibilityInfo
            onChange={updateAccessibilityState}
          />
          <Text>My accessible component</Text>
        </View>
      );
    };
    
    export default MyComponent;
    

    4. TalkBack and VoiceOver Support

    Both these function belongs to screen reader services, particularly designed to give verbal feedback to visually impaired app users. It also possesses inbuilt support for these services through AccessibilityProps. Let’s see the below example.

    import React from 'react';
    import { Text, View } from 'react-native';
    
    const MyComponent = () => {
      return (
        <View>
          <Text
            accessible={true}
            accessibilityLabel="Hello World"
            accessibilityHint="This is a greeting message"
            accessibilityRole="header"
            accessibilityState={{ selected: true }}
            accessibilityTraits={['header']}
          >
            Hello World
          </Text>
        </View>
      );
    };
    
    export default MyComponent;
    

    6. AccesiblityEvent

    It empowers the React programmers to handle the accessibility events on the app view simply. It also lets them get notifications whenever users interact with the app’s accessible components. Let’s see the example of a React AccesiblityEvent.

    import React, { useState, useEffect } from 'react';
    import { Text, View, AccessibilityInfo } from 'react-native';
    
    const MyComponent = () => {
      const [eventCount, setEventCount] = useState(0);
    
      useEffect(() => {
        const onAccessibilityEvent = AccessibilityInfo.addEventListener(
          'announcementFinished',
          handleAccessibilityEvent
        );
    
        return () => {
          AccessibilityInfo.removeEventListener('announcementFinished', handleAccessibilityEvent);
        };
      }, []);
    
      const handleAccessibilityEvent = (event) => {
        setEventCount(event.eventCount);
      };
    
      return (
        <View>
          <Text>Accessibility events fired: {eventCount}</Text>
        </View>
      );
    };
    
    export default MyComponent;
    

    Schedule an interview with React developers

    Conclusion

    To summarize, React Native accessibility is the most vital element in mobile application development to ensure equal access and usability for all app users, including those with a disability. However, accessibility has become the primary right in the faster growth of mobile apps. React Native gives several tools and features which is easy for React experts to develop an accessible app.

    Developers can make inclusive mobile apps that prioritize accessibility in their development phase. It gives the coders and users advantages, raises the potential user base, and ensures equal access to their digital services. But, if you are confused about how React Native Accessibility will scale your audience, take the help of the leading React Native App Development Company like BOSC Tech Labs, which will assist you in achieving your business goals.

    Frequently Asked Questions (FAQs)

    1. What is the significance of accessibility evaluation?

    Accessibility testing means ensuring web or mobile applications are accessible for people with disabilities like hearing problems or more. Hence, it ensures that content on the web is teachable to anyone without any barriers.

    2. How to check accessibility in React Native?

    To test the accessibility of React Native coding, open Xcode and go to the open developer tool, i.e., Accessibility Inspector. Hence, after tapping the icon, please search for your emulator window and select a desired component to identify its accessibility props.

    3. What is the functionality of React Native development?

    This framework enables developers to develop robust and scalable mobile apps with existing JavaScript knowledge. It gives faster mobile development and efficiently shares code across the web, iOS, or Android. It didn’t sacrifices user experience or the app’s quality.

    Book your appointment now

  • Using Axios in React – Learn All About React Query With Axios

    Using Axios in React – Learn All About React Query With Axios

    The most frequent task while working with web apps in React is interacting with backend services. Typically, the HTTP protocol is used for this to learn more about using Axios in React.

    We can all easily fetch data and send HTTP queries with the help of the widely used XML Http Request interface and Fetch API.

    In this article, we will learn about an awesome Javascript library called Axios and some key features of Axios that have helped frontend developers to communicate with the backend in React.

    What is Axios in React?

    Axios is a Javascript library that connects to the backend API and controls HTTP protocol requests. It allows us to handle asynchronous code and helps to reduce loading time.

    Add Axios to your project.

    Run the following command to install Axios using npm:

    Example

    	
    npm i axios
    

    Get Request Using Axios

    First, create a component; we have created here component, namely Posts and put below code in the Posts.js file :

    Example

    import React, { useEffect, useState } from 'react';
    import axios from 'axios';
    
    const Posts = () => {
      const [posts, setPosts] = useState([]);
    
      useEffect(() => {
        const fetchPosts = async () => {
          try {
            const response = await axios.get('url/posts');
            setPosts(response.data);
          } catch (error) {
            console.error('Error fetching posts:', error);
          }
        };
    
        fetchPosts();
      }, []);
    
      return (
        <div>
          {posts.map((item, i) => (
            <div key={i}>
              <p>{item.name}</p>
            </div>
          ))}
        </div>
      );
    };
    
    export default Posts;
    

    First, import Reacts useEffect and useReact hooks and also import Axios to make http requests. Then, with the help of the useEffect, we can use the get method to make a get request to our endpoints and then use the then() method to get the response data and update the post’s state.

    We receive an object in the response, and after assigning the object to the post’s state, we can use it in the component.

    Post/Put request using Axios

    Create the AddPosts.js file and add the below code to the file :

    Example

    	
    import React, { useState } from 'react
    import axios from 'axios’
    const AddPosts = () =› {
    const [postData, setPostData] = useState({
    postName:
    });
    const handleChange = (e) =› {
    e.preventDefault();
    setPostData(H
    postName: e.target.value,
    const submitForm = (e) => {
    e.preventDefault();
    axios.post (url/posts, { postData }) .then ( (response) =› {
    console.log (response);
    });
    };
    

    Example

    	
    return (
    ‹div>
    <p>Add Posts</p>
    ‹div>
    <form onSubmit-{submitForm}>
    <label>
    Post Name
    <input type-"text" name- "postName" onChange-(handleChange)
    ‹button type-"submit"›Add</button>
    </label>
    </ form>
    </div>
    </div>
    export default AddPosts;
    

    We halt the form’s default operation by using the SubmitForm function. The state is then updated to reflect the user’s input. The POST method returns the response object with data that we can utilize inside the then() method.

    In the same way, we can use the put method to update the data. For that, we need the axios.put method.

    Schedule an interview with React developers

    Delete Request Using Axios

    We can use the delete method to delete items using Api. For that, create a DeletePost.js file and add the following code :

    Example

    	
    return(
    <div>
    <p>Delete Posts</p>
    ‹div>
    <form onSubmit={handleDelete}>
    <label>
    Post Id
    <input type-"number" name-"id" onChange-(handleChange /
    <button type-"submit"›Delete‹/button›
    </label>
    </form>
    </div>
    </div>
    );
    };
    export default DeletePosts;
    

    Here also, the response object contains information about api response.

    Example

    	
    import React, { useState } from 'react';
    import axios from 'axios"
    const DeletePosts = () =› {
    const [postData, setPostData] = useState {
    id:
    });
    const handleChange = (e) =› {
    e.preventDefault ();
    setPostData(K
    id: e.target .value,
    b);
    };
    const handleDelete = (e) =› {
    e.preventDefault ();
    axios.delete(url/posts/${postData.id*).then((response) =› {
    console. log (response); });};
    

    Handling Error using Axios

    Sometimes there may be problems with the passing data, the wrong url used or maybe backendnetwork issues. All those types of Errors also can be handled using Axios. Let’s See the below example for your reference :

    Example

    	
    useEffect (() =›
    {
    axios
    get ('url/posts")
    .then ( (response) -&gt; setPost (response? .data))
    .catch( (error) -&gt; console. log(error));
    } []);
    

    Here, we have passed the wrong url. In that case, axios will throw an error in the catch method instead of running the then() method. That way, we can capture the errors using axios also.

    Conclusion

    There are also many other features we can use with Axios, like working with promises using async and await. Also, it provides features like transforms(which allow you to provide functions to transform the outgoing or incoming data) and interceptors(which can be attached to fire when a request is made or when a response is received).

    Suppose you want to build a ReactJS application that utilizes Axios for data fetching and handling. In that case, it may be a good idea to hire ReactJS developer who has experience working with both technologies. They can help you build a high-quality web application that meets your business needs and exceeds your users’ expectations.

    Frequently Asked Questions (FAQs)

    1. What is Axios?

    Axios is the promised-based HTTP library that helps programmers make requests independently or as a third-party server to fetch data. Thus, it delivers several ways to create requests like GET, PUT, DELETE and POST.

    2. What is the use of Axios in React?

    Using Axios in react allows you to communicate with APIs simply in our React apps. Other methods, such as Fetch or AJAX, achieve it. Axos gives a little bit more functionality, which goes a long way with the React apps. Hence, Axios is the promise-based library used with a Node.

    3. Why use Axios with a React query?

    At remote, Axios and React query utilize to construct the “data layer” and interact with API endpoints. Combining these two libraries will easily fetch, cache and update data in React apps.

    Book your appointment now

  • Basic Animation in React Native using Animated API

    Basic Animation in React Native using Animated API

    Animation in react native using animated API are an important part of the UX of an application. However, animations will significantly impact a user for a better interaction experience, and it smoothens user engagement. Also, there is the extended functionality to perform; animation is the most useful idea to engage users.

    Animations have the moment from a static state to a motion state for better user interaction. It also has multiple transitions to show elements, making it amazing.

    You might be thinking of integrating React Native Animations by utilising Animated API and searching for how to beg. Then, here is the complete guide on adding React Native animations from scratch till the end.

    Types of React Native Animation

    Let’s discuss the following React Native Animation Types below.

    1. Animated.timing()

    Allows us to define specific values over a specific amount of time.

    2. Animated.spring()

    Define animations from beginning points to finish points without defining time as we did in timings.

    3. Animated.parallel()

    Describing animations in an array to trigger at a similar time.

    4. Animated.sequence()

    It allows us to use all the pre-defined animations in the array to trigger one after another.

    React Native Animated API

    React Native provides an Animated library which helps us to do various animation effects in our application. It is very easy to use and implement in our code. So, in this blog we will see the basic concepts, implementations and methods of Animated library.

    Firstly we require to import the Animated module from react-native

    	
           import {Animated } from 'react-native';
    

    Now we need to set the initial Animated value. For that, we can use the useRef hook from React.

    	
            const animatedValue = useRef(new Animated.Value(0)).current;
    

    Now we need to set the initial Animated value. For that, we can use the useRef hook from React.

    So we have set our initial value to 0.

    Now let’s see an example to understand this; suppose there is a text, and you must move it horizontally, like oscillating to the right and left at a particular interval. We can do that now. You need to position the text in the centre first.

    In style, there is a transform property. This provides another two properties that we can use to move content horizontally and vertically.

    translateX: This will move the contents horizontally.
    translateY: This will move the contents vertically.

    	
    <Text style={{ fontSize: 20, transform: [{ translateX: 50 }] }}>
        Hello World!
        </Text>
    

    In the above code, we are directly provided with a fixed value of 50. What happens if we can provide a changing value instead of this fixed value? It will create an animation on the screen.

    Yes, if the transform value changes, it will reflect on the screen also because our content will move according to the value we are providing, and we can create some animations on the screen using that.
    So using this animated library, we can create changing values or animated values.

    For making an oscillating text horizontally, first, we need an initial value, say 0; then the value increases to 50; after reaching 50, it starts to decrease and reaches 0. Then the value again starts decreasing and reaches -50. After reaching the negative end, the value starts increasing.
    If we can change such a value, we can create an oscillation effect on the screen.

    Now we can make such a value using the Animated API.

    Already, we have set our initial animated value to 0. Now we need to increase it. For that, we can use one method in the Animated library.

    	
     Animated.timing(value, configuration)
    

    So using this timing method, we can change our animated values concerning the time. It has two parameters; one is the value, which is an animated value. Another one is configuration.

    	
    const moveRightX = () => {
        Animated.timing(animatedValue, {
          toValue: 50,
          duration: 4000,
          useNativeDriver: false,
        })
      };
    

    Here I have created a function named moveRightX which has a timing method.

    So you can see that we have passed the animated value as the first parameter, which we have initialized into 0 before.

    Next is the configuration part. As you see, toValue accepts a value we need at the end of the animation.

    Also, we can provide the duration of the animation in milliseconds.

    Here I have provided the duration as 4000 ms, which means our value will change from 0 to 50 in 4000 ms.

    Also the third one,useNativeDriver: false, also tells us not to use the native driver for this animation.

    So now we have a changing value from 0 to 50. What would happen if we provided this changing value to transform the property in style? Our text moves to the right. Let’s call this function in the useEffect and add this dynamic value to our component.

    	
    useEffect(() => {
        moveRightX();
      }, []);
    
    <Animated.Text style={{fontSize:20,transform:[{translateX:animatedValue }]}}>
        Hello World!
     </Animated.Text>
    

    You must notice that we have changed the normal into . Otherwise, it will show an error because we are using some animated values that do not support the normal . So we need to change it into .

    Now you can see that your Text is moving to the right side and stops. You have done a simple animation now.

    Output

    But we need to make better-oscillating text to the right and left. For that, we need to take a few more steps.

    Let’s create another function for creating a decreasing animated value.

    	
    const moveLeftX = () => {
        Animated.timing(animatedValue, {
          toValue: -50,
          duration: 4000,
          useNativeDriver: false,
        })
      };
    

    Here you can see that you have given a negative value for toValue.So it will decrease the value to -50.

    But one problem is that you must call this only after completing the first animation towards the right side. For that, we can use the start method here. We can attach a start method to our timing method. Thus we can do something right after the animation ends.

    So we can make some changes to our initial function,

    	
    const moveRightX = () => {
        Animated.timing(animatedValue, {
          toValue: 50,
          duration: 4000,
          useNativeDriver: false,
        }).start(moveLeftX);
      };
    

    You can see that we have added a start () method at the end. In that case, we are calling another function. You can perform any other codes here as you wish.

    We can add a start() in the moveLeftX function. Thus, it will call moveLeftX at the end. By doing this, we are creating a changing or oscillating value.

    If you look closely, you can see that your text is starting to oscillate in the right and left directions. You can adjust the duration as per your requirements. Thus, you can adjust the speed of the animation as you like.

    Output

    One more thing is that now we have given this animated value to the translateX property. If we provide this value to translateY, what would happen? The text would start moving vertically to the top and bottom. Let’s check that also.

    	
    <Animated.Text style={{fontSize:20,transform:[{translateY:animatedValue }]}}>
        Hello World!
     </Animated.Text>
    

    Output

    It’s not the end. You can do much more; suppose we provide this animated value to the fontSize; you can see some other interesting animation. Let’s check that also. I have removed the transform property and given the fontSize with our animated value. Now you see the text size is increasing and decreasing.

    	
    <Animated.Text style={{ fontSize: animatedValue }}>
        Hello World!
       </Animated.Text>
    

    Output

    Instead of this text, we can animate an image here. But remember, you should use , not the normal <Image> tag.

    	
    <Animated.Image
              source={{ uri: 'https://reactjs.org/logo-og.png' }}
              style={{ height: animatedValue, width: animatedValue }}
            ></Animated.Image>
    

    In the above code, you can see that I have given an animated value for the height and width of the image. Thus, you can see an animated image on the screen.

    Output

    In this way, you can easily animate your content. This is a basic example for beginners. We can provide this animated value to other style properties, such as opacity, flex, etc. You can create animations by adjusting those values according to your needs.

    Using this idea, you can create a header in which the height increases or the width increases and decreases. You only need to create a changing animated value for the header height or width.

    If you provide this changing value to opacity, it will vary dynamically. But its range must be between 0-1.when the opacity reaches 0, the component will disappear. Thus you can create something which is appearing and disappearing. I have changed the toValue to 1,0 respectively in the following functions.Also added opacity in style and provided the animated value for the image.

    	
    const moveRightX = () => {
        Animated.timing(animatedValue, {
          toValue: 1,
          duration: 4000,
          useNativeDriver: false,
        })
      };
    
    	
    const moveLeftX = () => {
        Animated.timing(animatedValue, {
          toValue: 0,
          duration: 4000,
          useNativeDriver: false,
        })
      };
    
    	
    <Animated.Image
              source={{ uri: 'https://reactjs.org/logo-og.png' }}
              style={{ height: 200, width: 200, opacity: animatedValue }}
            ></Animated.Image>
    

    Output

    Following are the six components that you can use in Animated API.

    1. Animated.Image
    2. Animated.ScrollView
    3. Animated.View
    4. Animated.SectionList
    5. Animated.Text
    6. Animated.Flatlist

    So in this section, we have learned some basic lessons for animations in React Native. There are many more methods and effects, which you can see in the React Native documentation.

    I have given the basic codes for your reference below.

    	
    import {
      StyleSheet,
      Animated,
    } from 'react-native';
    import React, { useEffect, useRef, useState } from 'react';
    
    
    const Animation = ( ) => {
    
    
      const animatedValue = useRef(new Animated.Value(0)).current;
    
    
      const moveRightX = () => {
        Animated.timing(animatedValue, {
          toValue: 50,
          duration: 4000,
          useNativeDriver: false,
        }).start(moveLeftX);
      };
      const moveLeftX = () => {
        Animated.timing(animatedValue, {
          toValue: -50,
          duration: 4000,
          useNativeDriver: false,
        }).start(moveRightX);
      };
      useEffect(() => {
        moveRightX();
      }, []);
    
      return (
           <>
          <Animated.View
            style={[
              style.container,
              {
                justifyContent: 'center',
                alignItems: 'center',
                height: 400,
                backgroundColor: 'yellow',
              },
            ]}
          >
    
    
     <Animated.Text style={{ fontSize: animatedValue }}>
    Hello World!
    </Animated.Text>
    
    
            {/* <Animated.Image
              source={{ uri: 'https://reactjs.org/logo-og.png' }}
              style={{ height: animatedValue, width: animatedValue }}
            ></Animated.Image> */}
          </Animated.View>
        </>
      );
    };
    
    
    const style = StyleSheet.create({
      container: {
        backgroundColor: 'white',
        margin: 0,
        flex: 1,
        paddingTop: 50,
        flexDirection: 'column',
      },
    });
     export default Animation;
    

    Schedule an interview with React developers

    Conclusion

    The Animated API in React Native offers a straightforward way to create basic animations within your mobile applications. By defining animated values and using various animation methods provided by the API, React developers can add life and interactivity to their apps, improving the overall user experience. Animations also make your app presentable, and users will like to interact with it.

    If you are interested in animating your React Native app within the project, contact us to leverage our top-notch app development services. Feel free to connect with us; we will give you the preferred engagement model.

    Frequently Asked Questions (FAQs)

    1. What is the objective of the Animated API in React Native?

    The Animated API provides a number of methods, such as sequence() and delay(), each of which accepts an array of the animations that will be executed and calls the start() or stop() function automatically as necessary. Hence, if one Animation is stopped or interrupted, all other animations in the group are also stopped.

    2. What is an animated API?

    Web animation APIs enable timing and synchronization adjustments to the presentation of web pages, i.e., DOM element animation. It does this by merging the two models, such as the timing and animation models.

    3. How do I implement React Native Animations?

    Animation in React Native can be integrated via the following steps:
    Step 1: Import the animation module
    Step 2: Declare the animated value
    Step 3: Specify how an animated value will change over the time
    Step 4: Set the animated style and renders the animated version of the component
    Step 5: Finally, begins the Animation.

    Book your appointment now