• How To Use For Loop To Generate a List Of Widgets In Flutter?

    How To Use For Loop To Generate a List Of Widgets In Flutter?

    Do you want to explore how to use a for loop to generate a list of widgets in Flutter? Then proceed with this blog. For using a for loop to generate a list of widgets in a Flutter, you need to consider effectively placing the various needed elements in the website. The steps used for generating a list of Flutter widgets are presented here. Hence start using for loop to generate a list of widgets in the Flutter.

    First, you must create the root folder, namely the widget list. Then I need to insert the list of widget codes in the document more effectively. When calling a for loop to generate a list of widgets in a Flutter, you need to use follow by the file name.

    Usually, the widget list effectively uses the widget name. The elemental text you add in quotation marks is displayed as the generating list of widgets. The widget list will display within the text’s parentheses as part of the web page.

    Grab effective factors

    After completing the list of widgets placements in the coding, you need to save the page and run the file in the browser for execution. After just compiling the lines, the list of widgets is made with effective operations.

    Here it is best to use a for loop to generate a list of widgets in the Flutter app development. Some more effective resource elements are needed for loop to generate a list of widgets in a Flutter. To use a for loop to generate a list of widgets in a Flutter, you must press the list of widgets button.

    Since launching the list of widgets, make the pickup the package manager and display available Flutter packages. After making the search elements for the search, enter a keyword for the widgets you want to use.

    For the process of use of the packages with the terms, you need to click use from the menu. After making the process, click yes when asked if you want to use the package, indicating that you accept the terms.

    Also Read: Create Multi-Line Textfield Input Like Textarea In Flutter

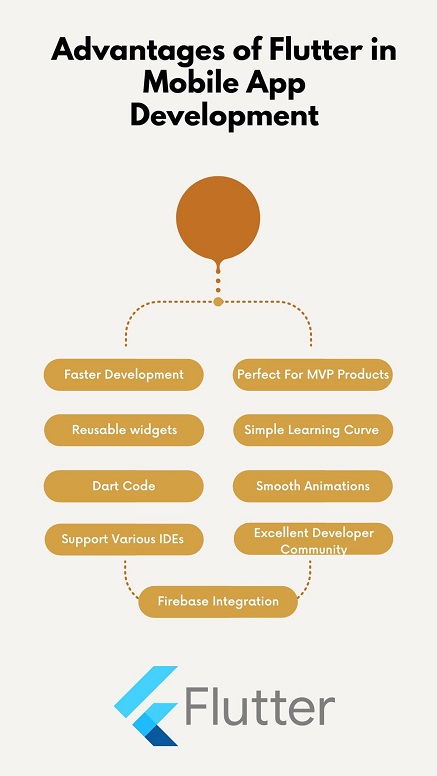
    Using for loop to generate a list of widgets in the Flutter

    Even though the list of widgets automatically determines the type of data used in the program, it usually can’t judge the data type. So for this, you need to use some other explicit conversion controls in the program, where they are called using a for loop to generate a list of widgets in a Flutter.

    For these, the operators are essential. The operators are used in the widget programs that deliver the commands and expressions in the programming conditions. The usage of for loop to generate a list of widgets in Flutter is very similar to the syntax for placing everything for various data types as the prefix of initial data for using data.

    The widely used and commonly available loop for generating a list of widgets in the variables is using the string for loop to generate a list of widgets in a Flutter to some other types or using the integer or the data type of data.

    Also Read: How to Create Copyable Text Widget In Flutter?

    Flutter programming codes on the user for loop conditions

    However, Loops in the Flutters are quite common and an essential one that needed to exist. They are essential because they use the execution of the programming codes based on the conditions.

    If the conditions are not satisfied, the program’s control stops executing for a loop.
    The for loop is also called conditional processing, for loop or the conditional expressions in the Flutter technology. The commonly used for loop on the Flutter are like the list of widgets, for loop, else for loop, and the switch statements to execute the codes needed to test the conditions before executing the commands in the program.

    Hire Flutter developer who have complete knowledge about for loop, which is similar to some other languages of the programming codes; for loop has also used the same set of conditional for loop programs for the execution of the programming commands as a result. The various types of conditional for loop statements and their usage are listed here.

    Impact of for loop conditions statements in a list of widgets

    It is for executing the commands of the programs. Whatever conditions are needed to execute the absolute conditions of the programs are executed by the ‘for loop’. The loop executes the programs’ commands based on true or false conditions.

    If it is true, it directly executes the printed commands, or else if it is false, the control goes to the end to finish the execution of the program without printing the commands of the program. Some conditions are needed to follow the loop in the programming codes.

    The conditions used in the Flutter should need to be used for loop inside the parenthesis, where they are initiated with an open parenthesis and enclosed with the closed parenthesis in the termination of for loop condition statement codes in the program.

    The condition statements enclosed with the parenthesis after the for loop are getting executed, and only the commands inside the braces are executed as the command codes. Only the commands in the execution get executed, and only the conditions are true in the program.

    Also Read: Flutter Rendering Widgets Using JSON Data

    For loop in a list of widgets

    The use of the list of widgets is very similar to the execution of the try and catch execution statements, where the condition has gotten checked with the try statements. If there are any exceptions in the programs, the exception messages are getting caught by the list of widgets and execute the statements with more effective manner.

    For executing the commands in the program, even after the condition has failed are used for the for loop. Like similarly, the try statements are the list of widgets for loop in the Flutters.

    	
    List<Widget> generateNumberWidgets(int count) {
      List<Widget> allWidgets = [];
      for (int i = 1; i <= count; i++) {
        allWidgets .add(Text('Sample Number $i'));
      }
      return allWidgets ;
    }
    

    Schedule an interview with WordPress developers

    Conclusion

    In this article, you must know how to use the for Loop to generate the Flutter app’s widgets list. The programming codes for loop condition statements should need conditional statements in the code block of the statements. Otherwise, the condition statements need to be executed. Hence you can explore how to use a for Loop to generate a list of widgets in Flutter.

    If you plan to develop the Flutter apps using For Loop to get the list of widgets in Flutter that enhance your business app performance and quality and give the featured-rich apps, then connect with the best mobile app development company in USA. Our Flutter app development team will help you understand the process step-by-step and are happy to help!

    Frequently Asked Questions (FAQs)

    1. How do you loop a list in Flutter development?

    The List. forEach() function can be used to loop via a list. However, you can pass the callback function to it; inside, we can access an item of the list in each iteration.

    2. How can you add the list item dynamically in Flutter?

    Suppose we add a Textfield to include the list item t the list dynamically. Then run this application, and you should view the TextField widget and add a button to add the item to the list dynamically. So, type in some name and then clock on Add button. Hence, the item will be dynamically added to the list.

    3. How do I make the dynamic ListView in the Flutter framework?

    We can use ListView.builder(….) in stateless widgets even if you need to view the different contents whenever a device is loaded with an application. Hence, with the help of stateful widgets, it can modify the screen content dynamically.
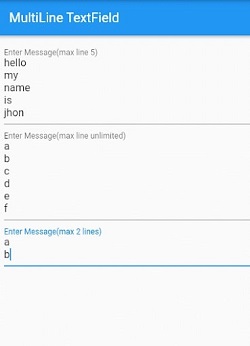
    Book your appointment now

  • What is the use of Mixins in Dart?

    What is the use of Mixins in Dart?

    There are various object-oriented programming languages, and Dart is one of them that keeps the code clean and straightforward in development. It has abstract classes and interfaces, but there is one hidden feature known as Mixins. The concept of the mixins existed when you wished to inherit multiple classes at a similar time. In this blog, you see the use of Dart in developing the Flutter apps for your project.

    What is Mixin?

    Mixins are a way to modularize your codebase by allowing you to attach different code snippets to a single class or module. This can make your code easier to read and maintain, as you can keep related code together.

    Here is a simple example of Mixin usage in Flutter:

    	
    mixin PrintMixin {
      void printData() {
        print("Printing data from Mixin");
      }
    }
    
    
    class ExampleClass with PrintMixin {
      void someMethod() {
        printData();
      }
    }
    

    In this example, the PrintMixin is a mixin that provides a printData method.
    The ExampleClass uses the keyword to mix in the PrintMixin into its behavior. When someMethod is called on an instance of ExampleClass, it calls printData which is provided by the PrintMixin.

    Why Mixin?

    Mixins are used in Flutter for the following reasons:

    1. Code Reusability:

    Mixins allow to reuse of code in multiple classes without creating a subclass relationship.

    2. Modular Design:

    Mixins help to separate concerns and create modular and maintainable code.

    3. Improved Readability:

    Mixins allow to simplify the inheritance hierarchy and make the code easier to read and understand.

    4. Multiple Inheritance:

    Mixins allow inheritance from multiple classes, which is not possible in single inheritance systems.

    5. Composition over Inheritance:

    Mixins provide a way to compose objects from smaller parts, which is a more flexible and maintainable way of building complex objects.

    Also Read: Flutter Rendering Widgets Using JSON Data

    Pure Subclassing

    In Flutter app development, pure subclassing refers to the traditional inheritance model, where a subclass inherits properties and behaviors from a superclass. It is a single inheritance model, meaning that a subclass can only inherit from one superclass.

    Mixins, on the other hand, provide a way to inherit properties and behaviors from multiple classes in a composition-based manner, without creating a subclass relationship. With mixins, a class can inherit properties and behaviors from multiple mixins using with the keyword.

    In pure subclassing, the subclass is tightly coupled with the superclass, and any changes to the superclass may affect the subclass. With mixins, the coupling is much looser, and changes to one mixin will not affect the others.

    Therefore, pure subclassing is a simpler and more straightforward way of inheriting properties and behaviors, while mixins provide a more flexible and composable way of creating complex objects.

    Mixins in Practice

    Mixins are widely used in Flutter development to achieve code reuse and modular design. Here are some examples of how Mixins are used in practice:

    1. State Management:

    Mixins can be used to manage the state of Flutter widgets, for example, a StatefulMixin provides a way to manage the state of a widget.
    >h3>2. Event Handling:

    Mixins can be used to handle events, for example, a GestureMixin provides a way to handle gestures on a widget.

    3. Animations:

    Mixins can be used to manage animations, for example, an AnimationMixin provides a way to animate a widget.

    4. Theming:

    Mixins can be used to manage themes, for example, a ThemeMixin provides a way to apply a theme to a widget.

    5. Logging:

    Mixins can be used to log messages, for example, a LogMixin provides a way to log messages in a widget.

    By using mixins, developers can build complex and reusable components by combining the properties and behaviors from multiple mixins. Mixins provide a way to build objects from smaller parts, which results in cleaner and more maintainable code.

    Also Read: Use Regex In Dart

    When to Use Mixins

    The mixins we are going to look at are the tickerproviderstatemixin and the singletickerproviderstatemixin. Both of these mixins are used for explicit animations in Flutter. By specifying one of these mixins in our widget definition, we tell Flutter that the widget is animated and that we want to get notified for frame updates so that our animation controller can generate a new value and we can redraw the widget for the next animation step.

    The SingletickerProviderStatemixin is used when you only have a single animation controller and the TickerProviderStatemixin is used when you have multiple animation controllers.

    	
    mixin SingleTickerProviderStateMixin<T extends StatefulWidget> on State<T>
       implements TickerProvider {
        Ticker? _ticker;
       @override
       Ticker createTicker(TickerCallback onTick) {
           // ...
           _ticker = Ticker(
               onTick,
               debugLabel:
                   kDebugMode ? 'created by ${describeIdentity(this)}' : null
           );
           return _ticker!;
       }
       @override
       void didChangeDependencies() {
           if (_ticker != null)
               _ticker!.muted = !TickerMode.of(context);
           super.didChangeDependencies();
       }
       // ...
    }
    

    The code example is shortened to just get a quick overview. As you can see, the
    SingleTickerProviderStateMixin makes use of the Flutter State-lifecycle methods. If we would now take a deeper look, we would also see that the Ticker that is used in the
    SingleTickerProviderStateMixin inherits the StatelessWidget to trigger the redrawing.
    One other area where mixins are heavily used in Dart and Flutter is JSON (de)serialization. Writing methods by hand to serialize and deserialize a data class is often error-prone and a repeating task. That’s one of the reasons why many developers resort to code generation Flutter app development tools to create that functionality. With mixins, the generated code can be easily included in the original data class.
    There are many more examples where mixins are super useful, for example:

    • Service locators
    • i18n (Internationalization/Localization)
    • Logging
    • etc.

    Schedule an interview with WordPress developers

    Conclusion

    Mixins are a powerful and flexible way to reuse code and achieve a modular design in Flutter development. They allow a class to inherit properties and behaviors from multiple classes without creating a subclass relationship, allowing the building of complex and reusable components from smaller parts. Mixins are widely used in Flutter for state management libraries, event handling, animations, theming, and logging, among other things.

    When used appropriately, mixins can significantly improve the readability and maintainability of your code. Still, they should be used cautiously to ensure the code is clear and concise. Mixins are a crucial concept in Flutter development, and understanding when and how to use them is essential for creating compelling and maintainable Flutter applications.

    However, you can hire Flutter developer if you face any issues while doing this in the development phase. BOSC Tech Labs has a development team, and you can consult them without hesitation. They will give you the desired outcomes to the clients and deliver them on time.


    Frequently Asked Questions (FAQs)


    1. What is the purpose of mixin?

    Mixins are helpful when the programmer wants to share functionality between various classes. Besides repeating the same code repeatedly, a standard functionality is grouped into a mixin and included in each class that needs it.

    2. How do you create the mixin in Flutter development?

    To integrate the mixin, make the class that extends an Object and declares the no constructors. Unless you wish your mixin to be usable as the standard class, use the keyword mixin rather than the class.

    3. What is the extension vs mixin Dart?

    Mixin is how to reuse the class code in the various class hierarchies. Mixins also solve the problem and make the code reusable. In contrast, the extensions will add functionalities to existing classes without changing them for development.

    Book your appointment now

  • Use Regex In Dart

    Use Regex In Dart

    Regular expressions are a way to describe patterns in strings of characters. They are widely present in programming languages, and although the syntax may vary, the general principles remain the same. For example, in Dart, they represent by the RegExp class, which allows you to search and manipulate strings in powerful ways. In addition, the app development company hire Flutter developer to use the Regex in Dart.

    A regular expression (also known as a regex or regexp) is a sequence of characters that define a search pattern widely used for pattern matching within strings. Dart supports regular expressions through its RegExp class, which has the same semantics and syntax as JavaScript.

    About Regex Class

    Regular expressions are to match text according to a set of criteria. They can take the form of a sequence of characters that indicate a specific pattern for the text input, and when used on the input text, it will either accept or reject it. If accepted, the regexp will also provide additional details about how it matched the text.

    Dart utilizes the same syntax and meaning of regular expressions as in the JavaScript framework. In addition, the language provides the matchAsPrefix capability, which tests if the regular expression is valid for a specific portion of the input commencing at a designated location. If the regexp is confirmed, Dart supplies the match details in the form of a RegExpMatch structure.

    Using the basic match check provided by the firstMatch method, you can construct all other methods of RegExp. It includes searching for occurrences of a pattern in a string, extracting parts of a string that match a pattern, replacing parts of a string that match a pattern, and testing whether a string contains a pattern.

    These operations take place through the RegExp methods, based on the firstMatch result. Flutter app development services will take experts’ help to complete the process.

    Example

    	
    RegExp exp = RegExp(r'(w+)');
    String str = 'Parse my string';
    RegExpMatch? match = exp.firstMatch(str);
    print(match![0]); // "Parse"
    

    Also Read: Why Choose Flutter for MVP Development in 2023?

    Parse in Dart

    Use allMatches to seek all matches of a regular expression in a string.
    This example searches the provided string for all specified regular expression pattern occurrences.

    	
    RegExp exp = RegExp(r'(w+)');
    String str = 'Parse my string';
    RegExpMatch? match = exp.firstMatch(str);
    print(match![0]); // "Parse"
    

    Construction Parameters

    We must create an instance of the RegExp class before utilizing it. The constructor of this class requires specific parameters, and their default values are as follows:

      • String source:

    A regular expression can be written in a string format using special characters to define a pattern to search for or match a particular text.

      • Bool multiLine: false:

    A Boolean indicates whether the regular expression will match across multiple lines.

      • Bool caseSensitive: true:

    A Boolean value that determines whether or not the regular expression should evaluate in a case-sensitive manner.

      • Bool Unicode: false:

    The “u” flag is a boolean value that specifies whether the regular expression should interpret in Unicode mode.

      • Bool dotAll: false:

    A Boolean that sets whether the period character matches line terminators in a regular expression.

    • Of the given criteria, the source string is the only one that is not optional.

    Class Methods

    The RegExp class provides a variety of valuable functions.

      • Iterable allMatches(String input, [int start = 0]):

    This retrieves all occurrences of the specified regular expression in the given string, starting at the optional index if provided.

      • RegExpMatch firstMatch(String input):

    This function will search for a pattern in the given string and, if found, return the first match. If no match is detected, it will return null.

      • Bool hasMatch(String input):

    This function returns a boolean value indicating whether or not the input string contains any matches.

      • String stringMatch(String input):

    This method returns the first found result as a string.

    • Match matchAsPrefix(String string, [int start = 0]):

    This method will look for a match at a specified position in the input string. If a start provides, it will use as the starting point for the search. Otherwise, the search will begin at the beginning of the string.

    Creating RegExp Patterns

    A regular expression constructs using a raw string (a sequence of characters preceded by the letter “r” such as r’I am a raw string’, r’12345String’, etc.). For example: RegExp(r’I am a RegExp’), RegExp(r’12345String’), RegExp(r'[0-9]d+ab99′), etc. A RegExp will match as many occurrences as possible if it meets a given pattern.Mastering regex in Dart empowers you to efficiently search and manipulate text. Explore our Generative AI service provider’s solutions to optimize your Dart applications and streamline complex data processing.

    Character Groups (d, w, s, D, W, S)

    A character group is a symbol representing any character within a given set. For example, d represents any single digit from 0-9, and w stands for any alphanumeric character (including numbers and letters a-z, A-Z, 0-9). s stands for any whitespace character (such as a space ‘ ‘, tab ‘t’, or newline ‘n’), D is the opposite of d and signifies any character that is not a digit.

    In addition, W is the opposite of w and signifies any character that is not alphanumeric; S is the opposite of s. It represents any character that is not a whitespace character and . signifies any character that is not a newline character (i.e., the end of a line, represented by n).

    Also Read: Create Multi-Line Textfield Input Like Textarea In Flutter

    Using Criteria Of Regex In Dart

    RegEx in Dart is implemented with the RegExp class, allowing developers to create and use regular expressions in their code. The RegExp class provides options for controlling case sensitivity and other valuable features. Additionally, engineers can include alternatives in the raw expression string when creating a RegExp object. It allows for more flexibility when building regular expressions in Dart.

    Example

    	
    // Removed /i at the end
    // Removed / in front - Thanks to Günter for the warning
    RegExp regExp = new RegExp(
     
    r"^WS{1,2}://d{1,3}.d{1,3}.d{1,3}.d{1,3}:56789",
     
    caseSensitive: false,
     
    multiLine: false,
    );
    print("allMatches : "+regExp.allMatches("WS://127.0.0.1:56789").toString());
    print("firstMatch : "+regExp.firstMatch("WS://127.0.0.1:56789").toString());
    print("hasMatch : "+regExp.hasMatch("WS://127.0.0.1:56789").toString());
    print("stringMatch : "+regExp.stringMatch("WS://127.0.0.1:56789").toString());
    

    In Dart, the RegExp Class is used to define a pattern for searching strings to determine if they match, and the hasMatch() method tests the pattern on a string to check if there is a match.

    Schedule an interview with WordPress developers

    Conclusion

    Dart’s RegExp class from Dart: core provides the same syntax and semantics as JavaScript when searching strings for matching patterns. It is a necessary Flutter app development tool for every project. However, this article has explained the usage of Regex in Flutter. Hence, it will upgrade your app development procedure with the strategies.

    If you plan to develop the Flutter app for your businesses, then you can consult a mobile app development company like BOSC Tech Labs, which will take care of your app and fit into your budget.


    Frequently Asked Questions (FAQs)


    1. How will Regex work?

    A regex pattern will match the target string. The pattern is created with the sequence of atoms. The atom is the only point within the regex pattern trying to connect with a target string. The simple atom is literal, but grouping the parts of a design to match the atom will require using () as metacharacters.

    2. When to use Regex in development?

    Regular expressions are the most useful in search and replace operations. It is the most typical use case, which looks for a substring that matches the pattern and will replace it with something else. Many APIs use regular expressions that permit you to reference the capture groups from a search pattern in replacement strings.

    3. How will you match 0 or 1 characters in Regex?

    A regular expression followed by a question mark (?) which matches the zero or one occurrence of the one-character regular expression. Hence, it fits any series of zero or more characters using “. *.”.

    Book your appointment now

  • Multi-Themes Using Riverpod in Flutter

    Multi-Themes Using Riverpod in Flutter

    Everyone is using Flutter, which is an integral task in handling everything. Of course, mobile apps are widely used because of their unique functionalities. There is an app for almost everything to handle well. It may be flexible enough and get into the UI and UX designs that keep well.

    They begin to carry out more things and evaluate based on the user to create a more personalized and comfortable experience with the app. You have to hire Flutter developer to handle multi themes in Flutter accordingly.

    The Riverpod takes a complete app to revolutionize the multi-themes forever. They come with more options to explore with dark and light modes forever. They will introduce such things to evaluate based on the opening.

    It quickly supports the basic dark and light mode themes for riverpod in Flutter designs. It is designed according to the requirements and will carry about the same use case forever.

    Dark and light theme mode often takes the best solution for handling many applications. It includes basic dark and light modes that are carried out immediately for Apple in WWDC introduced in dark mode. It will visualize based on the blank home screen page, and the widget should handle well on the material app for riverpod. They come with more themes to prefer the Riverpod in a Flutter.

    Creating Themes

    Of course, it will create themes that work well by including a new folder style for creating dark and light modes. While creating a class named style, it carries out style. Dart file and flexible enough to get into the class theme creation. It functions basically by working on the property to make it comfortable.

    Understanding the ThemeData

    Themedata center should be flexible enough and maintain the overall visual Theme. It includes the best possible thing to evaluate based on the app designs. Riverpod has to take theme property by focusing on better configuration.

    It includes an appearance on the entire app. The ThemeData has to create a new solution and change it within the app theme. So, it includes basic properties by focusing on official Flutter doc theme data to set out theme data forever.

    Also Read: Adding SVG Images In Flutter App

    Handle the alternative and configure apps using ThemeData

    ThemeData magnificence defines the configuration of the general visible Theme for a MaterialApp or a Flutter widget sub-tree in the app. This MaterialApp subject matter belongings may be used to configure the arrival of the complete app.

    ThemeData has the subsequent homes we can alternate and configure the app’s subject matter. Below are the fundamental homes of the ThemeData that we will configure. All these homes are self-explanatory. You can examine them approximately withinside the reliable flutter doc — ThemeData.

    Create a Light Mode Theme

    Of course, creating a light theme mode should take build context as the basic parameter. It takes a full pledge solution and includes a back type option. It will be configured mainly by working on the features to be established. It will assign the hues to the themedata and go back to this themedata. It will be accomplished based on uploading the subsequent code to the feature.

    A not unusual place Function for Different Themes

    It allows users to create a Flutter app development in the riverpod by focusing on controlled subjects. It should be amazing and able to find parameters in focusing on features. It will record them with alternative colorful things to explore about placing the subject in the riverpod.

    Returning the Correct Theme as required

    Themedata should be flexible and carried out with statistics. They include the foremost thing and use the switch option. It will go back to theme data connected with choosing distinct outcomes. Thus, it should be easier for you to get into those capabilities for handling the features well. Thus, the Theme for riverpod takes a complete level in choosing pinnacle-focused values.

    Custom TextTheme

    Using custom color is simplest than 1/2 of a part of our theming journey. Let us additionally create a custom TextTheme that may be used to subject matter the textual content of the app.

    Inside the Styles magnificence itself on the pinnacle, we could create a default textual content fashion that we can edit to create custom textual content subject matter.

    Understanding TextTheme

    Just like ThemeData allows in configuring the general visible look of the app. TextTheme allows in Configuring universal textual content of the app. We can use TextTheme to determine the sort of textual content you need.

    Creating Custom TextThemes

    Add the subsequent feature and the cease of your Styles magnificence. In this feature, we personalize the above created _defaultTextStyle and assign them to the parameters of TextTheme.

    We use the copy with the approach in this feature to regulate the _defaultTextStyle and feature to alter the font length and color. You are loose to test all of the configurations here. That’s it. We’re carrying out developing the Styles and Theme configuration. Our Styles and Themes are prepared for use inside our utility.

    Also Read: Why Choose Flutter for MVP Development in 2023?

    Adding Riverpod to Project

    Next, we can use riverpod to choose and upload the above-created subject matters into our utility. We could begin by including riverpod dependencies in our pubspec. yaml document below the dependencies phase as follows. You could have a one-of-a-kind model; however, as long as it is above 2. zero. 2, you’re right to go.

    Creating ThemeProvider

    Let’s create a Theme Provider so that it will assist us in offering the subject matter that we’ve got decided on to our complete app. upload a non-public variable so that it will maintain the int price of the chosen subject matter to be handed to the themeData feature withinside the Styles magnificence. Let’s provide zero because of the default price.

    Create a folder named Provider and create a new document named theme_provider.dart. Add a category named ThemeProvider, which implements ChangeNotifier inside this document. This will assist us in informing while the chosen subject matter is modified and adjustments could be delivered to the utility.

    First of all create a function that provide the theme according to the index provided

    	
    static TextTheme textTheme(BuildContext context) {
       return TextTheme(
         headline1: _defaultTextStyle.copyWith(
             fontSize: 100,
             color: Theme.of(context).indicatorColor,
             fontWeight: FontWeight.w200),
         headline2: _defaultTextStyle.copyWith(
             fontSize: 25, color: Theme.of(context).indicatorColor),
         headline3: _defaultTextStyle.copyWith(
             fontSize: 16, color: Theme.of(context).indicatorColor),
         headline4: _defaultTextStyle.copyWith(
             fontSize: 18, color: Theme.of(context).indicatorColor),
         headline5: _defaultTextStyle.copyWith(
             fontSize: 14, color: Theme.of(context).indicatorColor),
         bodyText1: _defaultTextStyle.copyWith(
             fontSize: 13, color: Theme.of(context).indicatorColor),
         bodyText2: _defaultTextStyle.copyWith(
             fontSize: 20, color: Theme.of(context).indicatorColor),
         subtitle1: _defaultTextStyle.copyWith(
             fontSize: 12, color: Theme.of(context).hintColor),
         subtitle2: _defaultTextStyle.copyWith(
             fontSize: 10, color: Theme.of(context).hintColor),
       );
     }
    

    Then:

    1. Wrapping the widget inside ProviderScope : In the main.dart wrap the widget that you pass inside the runApp function with a ProviderScope widget

    	
    void main() {
    runApp(ProviderScope(child: MultithemeRiverpod()));
    }
    

    2.Add theme index inside Riverpod

    	
    int _themeIndex = 0;
    

    3.Then wrap material app with consumer

    	
    @override
     Widget build(BuildContext context) {
       return Consumer(builder: (context, ref, child) {
        // Create a theme notifier variable to use the index
         return MaterialApp(
           // Todo: Add theme styles here
           debugShowCheckedModeBanner: false,
           home: HomeScreen(),
         );
       });
     }
    }
    

    4.Then create themeNotifier for notify the theme to the function of themes

    	
    final themeNotifer = ref.watch(themeProvider);
    

    Call the themeData function from theme:

    	
    theme: styles.themeData(themeNotifer.themeIndex, context),
    

    5.Do not forget to initialize the style variable

    	
    Styles styles = Styles();
    

    Schedule an interview with WordPress developers

    Conclusion

    In the end, we could create a feature that will assist us in assigning the int price to the non-public variable created on the pinnacle. This feature takes an int price as a parameter and assigns that price to a non-public int variable. We notify Listeners so that our widget and alertness pay attention to the adjustments that took place. Create an international variable under the ThemeProvider magnificence to make our subject matter issuer reachable throughout the utility.

    You now get the idea of the multithemes using the riverpod in Flutter. If you still have any questions, feel accessible to partner with the best Flutter apps development company like BOSC Tech Labs, which has an expert team who is always ready to help you with their skills, knowledge, and experience. Hence, they will showcase the perfect path to meet your project requirements.


    Frequently Asked Questions (FAQs)


    1. What is Riverpod state provider in Flutter?

    StateProvider is the provider which will expose the method to modify its state. It is just a simplification of StateNotifierProvider, created to ignore writing a StateNotifier class for simple use cases. Stateprovider exists primarily to grant the modification of a simple variable by a user interface.

    2. How many kinds of providers are there in Flutter?

    State management with the provider usually has three significant components: ChangeNotifier class in Flutter, ChangeNotifierProvider, and the consumer widgets.

    3. Is Riverpod better than BLoC?

    Riverpod is an excellent state management package that is, on certain occasions, simple than the BLoC. It gives the same level of documentation, and many people are starting to pick it up in real-world apps. Hence, the dependency injection has higher standards than the bloc’s.

    Book your appointment now

  • Create Multi-Line Textfield Input Like Textarea In Flutter

    Create Multi-Line Textfield Input Like Textarea In Flutter

    Obtaining user details that require a substantial amount of data from users can become necessary while developing and designing a mobile application. Users should showcase Multiline TextField to access that massive amount of information. Further, this article is about developing a multiline text field widget in Flutter.

    A TextField widget can only display one line by default. However, TextField needs to be extendable. For instance, the users have to input enormous amounts of Text.

    The TextField’s maxLines attribute allows you to add several lines. Finally, specify how many lines you need for that particular TextField. For example, several programming businesses take the help of professional developers to design the multiline text field in Flutter.

    About TextField Widget

    Among the most essential and popular widgets in Flutter is TextField. In numerous circumstances, it is helpful to take user input. Utilizing it in a messaging platform to enable users to send messages is a perfect example. However, there are situations when users might have to input a lengthy message while also wishing to view the entire Text.

    You may include the multiline TextField. Multiline TextFields are input fields that accept Text across multiple lines. These fields are helpful in situations where it is necessary to collect customer insights, user comments, and descriptions, among other things. By adjusting the TextField’s keyBoardType and maxLines properties, we may create multiline TextFields.

    About the issue

    After adding it to the Flutter application development, you’ll discover that as you type a long message that doesn’t suit a single line in the TextField widget. The old Text of the initial Text begins to migrate toward this left side. Users might be agitated by this, which could ruin their experiences.

    Methods to create Multiline Textfield in Flutter

    The expands, maxLines, and minLines properties help construct the multiline TextField in Flutter. Each of these methods is useful, depending on the circumstances.

    1. Utilizing minLines and maxLines Properties

    The TextField can create multiline using the minLines and maxLines, and minLines settings. The TextField height is presented initially according to the supplied minLines. After which, it rises until it exceeds the line indicated by the maxLines parameter. At this point, it displays the scrollbar just after the Text exceeds maxLines.

    Stages

    Stage I: Add the minLines variable within the TextField and assign it to 1.
    Stage II: MaxLines, a new function, should be added and configured to 5. It will guarantee that TextField displays a complete message up until the fifth line.
    Stage III: Launch the application.
    Here is the coding:

    TextField(
    decoration: InputDecoration(labelText: 'Enter Message'),
    keyboardType: TextInputType.multiline,
    minLines: 1, // <-- SEE HERE
    maxLines: 5, // <-- SEE HERE
    )
    

    2. Using Just maxLines parameter

    You may occasionally permit TextField heights to increase as much as its parent permits. The maxLines parameter helps do this.

    Stages

    Stage I: Add the maxLines variable within the TextField and configure it to zero.
    Stage II: Launch the application.
    Here is the coding:

    TextField(
    decoration: InputDecoration(labelText: 'Enter Message'),
    keyboardType: TextInputType.multiline,
    maxLines: null, // <-- SEE HERE
    )
    

    3. Using expands Property

    You should also enclose your TextField widget within the Expanded widget. However, with Flutter expertise, you’ll discover that the TextField underlining also appears beneath the first line. So, it expands the attribute to display the underlining on the final line.

    Stages

    Stage I: Add the maxLines variable to TextField and configure it to zero.
    Stage II: Modify the expand parameter to true after adding it.
    Stage III: Launch the function.
    Here is the coding:

    Container(
                 height: 300,
                 child: Column(
                   children: [
                     SizedBox(
                       height: 10,
                     ),
                     Expanded(
                       child: TextField(
                         decoration: InputDecoration(labelText: 'Enter Message'),
                         keyboardType: TextInputType.multiline,
                         maxLines: null,
                         expands: true, // <-- SEE HERE
                       ),
                     ),
                     ElevatedButton(
                       onPressed: () {},
                       child: const Text(
                         'Send',
                         style: TextStyle(fontSize: 24),
                       ),
                     ),
                   ],
                 ),
                ),
    

    Another method

    Stage 1: Open Android Studio and start a new project

    Navigate to Android Studio Configuration for Flutter Programming for instructions on configuring Flutter Development on Android Studio. Afterward, start a new project in Android Studio by following the instructions in Creating a Simple App in Flutter.

    Also Read: How to Create Copyable Text Widget In Flutter?

    Stage 2: integrate the material bundle

    By including the material module, which provides us with the necessary functionalities, we can execute the runApp feature for the primary purpose, which will then launch the program. Below is the code:

    import 'package:flutter/material.dart';
    void main() {
       
    runApp(RunMyApp());
    }
    

    Stage 3: Stateless Widget generation

    Since the application cannot modify its state, we must now create a stateless widget and afterward provide the materialApp widgets, enabling us to set the headline, background, and numerous other options. Below is the coding:

    class RunMyApp extends StatelessWidget {
        const RunMyApp({super.key});
        
        @override
        Widget build(BuildContext context) {
            return MaterialApp();
        }
    }
    

    Step 4: Building Scaffold Widget

    Specify the homepage parameter, and a scaffold widget with the AppBar and body properties can appear. AppBar allows us to specify the title, color, leading logo, and trailing logo. The TextField with values maxLines, keyboardType, and minLines is within the body. Below is the coding:

    home: Scaffold(
            appBar: AppBar(
              title:const Text('MultiLine TextField'),
            ),
            body: Padding(
              padding: const EdgeInsets.all(8.0),
              child: Column(
                crossAxisAlignment: CrossAxisAlignment.start,
                children: const [
                  TextField(
                    decoration:
                        InputDecoration(labelText: 'Enter Message(max line 5)'),
                    keyboardType: TextInputType.multiline,
                    minLines: 1, // <-- SEE HERE
                    maxLines: 5, // <-- SEE HERE
                  ),
                  TextField(
                    decoration: InputDecoration(
                        labelText: 'Enter Message(max line unlimited)'),
                    keyboardType: TextInputType.multiline,
                    maxLines: null, // <-- SEE HERE
                  ),
                  TextField(
                    decoration: InputDecoration(labelText: 'Enter Message(max 2 lines)'),
                    keyboardType: TextInputType.multiline,
                    maxLines: 2,
                  ),
                ],
              ),
            ),
          ),
    

    Output

    Conclusion

    This article covered the multiple methods for building multi-line TextFields in Flutter. Hire Flutter experts from the well-reputed app development company who initially look at the issue of employing a single-line TextField before looking at every method for making TextField multi-line. Fundamentally, the properties of the expand, maxLines, and minLines are combined to form the Multiple lines TextField. It upgrades your programming area and app development process.

    To create a multi-line textfield input like a textarea in Flutter, use the TextField widget with maxLines set to null. At BOSC Tech Labs, a generative AI development company, we specialize in creating such advanced Flutter features.

    Suppose you want to develop a Flutter app for your enterprise. In that case, you can consult the best mobile app development company, like BOSC Tech Labs, who will assist you with your project and also take care of an app that must fit perfectly into your budget.

    Schedule an interview with WordPress developers 

    Frequently Asked Questions (FAQs)


    1. How do I make the multi-line textarea?

    To develop the multi-line text input, use the HTML tag. With that, set the size of the textarea by using cols and rows attributes. It is also used inside the form to allow users to input the text over multiple rows. Hence, it specifies the page load text area, which automatically gets the focus.

    2. Can the value be added to the textarea?

    To add value to textarea, you can add to the value property of input through the document.getElementById. Hence, get the reference of this element and modify the value.

    3. What does multi-line text permit you to do?

    The Multi-line text field is utilized to save a considerable amount of text. It gives various formatting options, like adding bulleted and numbered lists. Use italics, bold, and underlined styling.

    Book your appointment now

  • Flutter Vs. React Native: Which is Best For your Project in 2026?

    Flutter Vs. React Native: Which is Best For your Project in 2026?

    Mobile application development is growing at a very fast pace of time. The new lifestyles and the latest methods of communication have raised the demand for mobile apps. But it is creating the app for iOS and Android, meaning you need two different teams with various skill sets. However, with the help of the cross-platform mobile app development framework, it is easy to develop an app for both platforms with a unified codebase.

    Cross-platform mobile apps platforms such as Google’s Flutter and Facebook’s React Native are two of the latest topics to debate when selecting hybrid app development platforms. But deploying the app on Apple Store or Google Play Store is the need of every business. However, shipping in the app market and selecting the correct technology stack is the most important step to take wisely. However, when we discuss the two most renowned platforms, React Native and Flutter, it is very difficult to find the most suitable for your project. But before going on any discussion, let’s discuss both these frameworks in detail.

    What is Flutter?

    Flutter is an open-source, cross-platform mobile application development framework that uses Dart language. As Google introduces Dart and Flutter, the business industry uses this framework to create robust and big-size enterprise apps easily. However, due to its huge capability of cross-platform app development, Flutter has gained much popularity in a very short time. Hence, it has given birth to many mobile apps which are getting appreciated by people.

    What are the benefits of Flutter App Development?

    1. Hot Reloading

    The hot reloading feature perfectly matches Flutter’s nature, which is the major advantage of utilizing Flutter for streamlining cross-platform development. However, with the help of this feature, the programmers can make the changes quickly, make instant tweaks, and then merge the updated elements. Hence, this approach has necessarily streamlined the development process and will make bug fixing easier.

    2. Embedded Application Builder

    The built-in app builder is another benefit of Flutter app development. Hence, this tool has many pre-developed UI elements that the developers must merge and customize. An app builder is flexible and allows creative and non-patterned ideas.

    3. Codebase Sharing

    Flutter-build applications can share the code between iOS, Android, and various other platforms by eliminating the requirement to rewrite it from scratch. Hence, this feature makes Flutter a great choice for MVP development. With this, the developers can deliver the app with a close-to-native look, test it with the targeted audience, and decide on the necessity of making a native application.

    4. High Productivity

    As Flutter is cross-platform, you can use a similar codebase for the iOS and Android apps. Hence, it will save time and resources.

    5. Great Performance

    Dart compiles into the native code, and there is no requirement to access the OEM widgets, as Flutter has its own. There is less mediated communication between the app and the platform, as Flutter is the SDK that gives reactive views without needing a JavaScript bridge. Hence, it contributes to the fast application startup times and the very few performance issues.

    6. Compatibility

    As the Flutter widgets are part of the app rather than the platform, you will get less experience or no compatibility issues on the various OS versions. Hence, in turn, less time is spent on testing.

    What is React Native?

    React Facebook launched Native. It is the most preferable and well-known cross-platform mobile app development framework. Hence, React Native uses JavaScript and simplifies Android and iOS app development with a single codebase.

    What are the major benefits of React Native App Development?

    1. Code Reusability

    The major benefit of React Native is that programmers are not required to make different codes for multiple platforms. However, approximately 95% of the code can be reused between two platforms, which helps to increase development speed and efficiency considerably. Thus, you will get a faster time-to-market with fewer maintenance efforts.

    2. Native look and feel

    React Native Components merges the blocks from a native user interface with their JavaScript and gives an app a native-like appearance. Moreover, by creating the blocks for the same iOS and Android, the look and feel of the app will be the same across the two platforms.

    3. Live Reload

    The live reload feature of React native permits you to view and work with the changes in real-time. You can fix the code while an app is loading and it reflects in the application with the automatic reload feature. Hence, reload the particular change area to save time on a compilation.

    4. UI Focused

    React Native makes use of the React JavaScript library to create app interfaces that are fast and responsive. It has great rendering abilities and utilizes the component-based approach, making it easy to make simple and complicated UI designs.

    Also Read: Top 10 Most Used React Component Libraries in 2022

    5. Cost-Efficiency

    As code is reusable in React Native, it helps you save up to 40% of development costs. Hence, you do not have to hire the two various Android and iOS developers to make the application. Therefore, the pre-built components in React Native will fasten the development process.

    6. Third-Party Plugins

    Developing the app from scratch is expensive; React Native gives several third-party plugin options, including JavaScript-based and native modules. Therefore, the third-party plugins alienate a requirement for the particular web view functions, and it helps to enhance an app’s functionality and performance.

    React Native Vs. Flutter: Which is the Best Cross Platform Mobile App Development Framework In 2023?

    Both React Native and Flutter is the renowned platform for cross-platform mobile app development. Hence, both have their benefits. So, let’s compare Flutter and React Native with the different criteria.

    1. Programming Language

    React Native uses JavaScript to make the user interfaces. It is easy for web developers to work with React Native because of its robust popularity of JavaScript. JavaScript is the highly preferable and the selected programming language among the programmers, and also it simplifies training the development team to work on React Native.

    On the contrary, Flutter uses the Dart language, which Google launches. As it is a client-centric language, Dart gives various benefits. Hence, Dart enables the assembling of famous OOP languages such as C++ and Java. You will easily get the command over Flutter if you have complete knowledge and understanding of any OOP language.

    2. Architecture

    In React Native architecture, JavaScript builds the bridge between the Native language and JavaScript. It works through the two-sided conversation by sending the JSON message. Hence, due to an asynchronous message transmission, it needs a smooth user interface for the app. However, React Native app development has the chance of lagging UI in the end as the bridge affects rendering speed.

    In Contrast, Flutter is a package that does not need any bridge to communicate with the native components. Hence, it has everything within itself, such as the Cupertino framework, materials design, etc. The Flutter benefit makes an app more predictable and robust to perform on various platforms than React Native.

    3. Installation and Configuration

    React Native gives an easy configuration process. You can Install React Native CLI globally with the help of the command line. In addition, you need to install Yarn and NodeJS as the package manager. You can install Flutter by downloading the binary for the specific mobile platform and adding it to your PATH variable. Hence, it can be easily done by the command line. Therefore, Flutter goes one step down in the installation phase, as the installation procedure is not as straightforward as React Native.

    4. Development Tools and Documentation

    React Native is robust, and developers with experience with JavaScript can use this framework. For example, essential features like navigation need to be better documented. So, finding the info about creating native libraries can be troublesome.

    In comparison to React Native, Flutter has a rich set of documentation. It gives in-depth guides in video and graphics format. The best thing about Flutter is that it has multiple tools like the Flutter inspector and debugger, which aids you in the mobile app development process.

    Schedule an interview with React developers

    5. User Interface

    Due To the JavaScript bridge, React Native renders a native component for single platforms. A user interface gives the look and feel of the mobile application. React Native provides readymade elements that behave like an app’s building block. Hence, it is toughest to replicate the complex UI in a React Native app. Flutter gives the UI widgets packaged within itself, which simplifies the native mobile app development. Thus, it eliminates the requirement for third-party libraries as it has a huge set of framework widgets. Besides that, Flutter apps are constant across all platforms.

    6. Developers Productivity

    React Native gives the functionality of reusability across all platforms. You can use many libraries created by the development community as the building blocks to fasten the mobile app development procedure. Moreover, React Native has a hot reload feature that will show the app changes without recompiling them. On the other hand, hot reload in Flutter will simplify an app iteration and get feedback instantly. Hence, Flutter gives fast app compilation.

    7. Community Support

    A large community matters when we talk about open-source mobile app development frameworks and React native has all this functionality. It is the best cross-platform mobile app development framework which Facebook launched in 2015. In comparison, Flutter has a very smaller community than React Native. But, later on, Flutter gained massive popularity among tech professionals and grew quickly.

    8. CI/CD Support

    React Native does not support the CI/CD solution for Google Play Store and Play Store delivery. Unfortunately, manual deployment for Google is well-documented. You require a third-party solution to automate your app deployment procedure. On the contrary, Flutter has a well-defined documented guide to develop and deploy the app on the Android and iOS platforms. Therefore, it enables an app deployment via the CLI, and in the case of any advanced customization, it permits third-party integrations.

    Schedule an interview with WordPress developers

    Conclusion

    In the Flutter Vs. React native, as there are no winners or losers. Every framework has its benefits and drawbacks. Some experts assume that Flutter is the future of mobile app development. At the same time, React Native will stay complicated and contend with some of the remarkable advantages and impressive React Native-based apps that are accessible in the market. Therefore, it is dependent on your budget and project specification.

    At BOSC Tech Labs, we work both on React and Flutter frameworks. Let us know if you are interested, and we will reach out as soon as possible. Consult us if you want to hire React developers or hire Flutter developers.

    Get in touch with us today!


    Frequently Asked Questions


    1. Which server is considered best For Flutter app development?

    Firebase is a Google-Powered backend service that will work great as the Flutter server-side. This platform gives various development tools that expedite mobile and web development assignments. Hence, it is well-known for the JSON-enabled NoSQL database, which saves and syncs the data in real time.

    2. Should I use React Native or Flutter?

    The Flutter framework comprises UI rendering components, device access APIs, testing, and navigation. In comparison to that, React Native must rely on third-party libraries to access most native modules. Hence, for better performance, you should opt for Flutter.

    3. What makes Flutter better than React Native development?

    Flutter relies on the developed widgets for customization, whereas React Native incorporates third-party customization components. Hence, Flutter delivers the most compatibility. Moreover, Flutter development is constructed on widgets, whereas React Native uses JSX.

    Consult Our Experts

  • Adding SVG Images In Flutter App

    Adding SVG Images In Flutter App

    In general, adding SVG images includes essential components. SVG images play an important role and are the major parts of this application. These factors are highly used to implement respective logic for the corresponding application.

    Apart from that, the SVG images were retrieved even though they also stored the SVG image state within the database. The SVG image is considered the conceptual and physical separation in small applications. It is also associated with the classes. It takes the work of the SVG image.

    Maintain user interaction

    SVG images are the most important components because it helps to maintain user interaction. With this help, people ultimately select a view within the Flutter app development.

    Adding SVG images helps display information, even though it has input and interaction responsibilities. It also involves handling query string values. At the same time, it supports passing the respective values to the corresponding SVG image, which is highly used to query the database.

    Views are essential components because it helps to display UI (user interface). In general, the UI is also created from SVG image data. It helps with the checkboxes depending on the current state.

    Includes different aspects

    Normally adding SVG images also supports creating applications based on your needs; it includes different aspects like input, UI, and business logic. This pattern is also highly used to specify different kinds of logic.

    The UI logic also belongs in the view. At the same time, the input logic also belongs in the respective SVG images. On the other hand, the business logic always belongs in an SVG image.

    In general, the loose coupling of adding SVG images supports parallel development, which means if one person or developer works with the logic of the SVG images, other developers can work with the view. Even the third developer has the chance to pay attention to the business logic of the respective SVG image.

    Consider the following factors

    If you are going to add SVG images, you need to consider the following factors carefully. It is the most important aspect of implementing the respective web application development. With the help of this, you can experience web forms-based applications that are highly used to work exactly. Before going to using SVG images as well as web forms, SVG images consider the approaches and advantages.

    Important benefits of adding SVG images

    The framework is designed to overcome all the drawbacks; it allows you to plug in your URL routing policy, view engine, and action-method parameter. Adding SVG images also supports taking the benefits of the dependency injection even though it is used in the inversion of control.

    It generally enables a user to create the respective object within the application. This process also helps to make testing much simpler as well as easier.
    At the same time, it offers extensive support because the powerful URL-mapping component gives great opportunities to build applications. In addition, it makes the process understandable and searchable URLs.

    You do not need to add the file-name extensions, but it shares support for naming patterns. It is high in the Flutter app representation.

    Use SVG images effectively

    In this process, you can get support to use SVG images, even if it helps to view templates. With this help, you can easily use the existing features such as master pages, declarative server controls, in-line expressions, templates, data binding and many others. Furthermore, it supports forms authentication as well as windows authentication.

    In addition, you can use this for the roles, output, URL authorization, data caching, membership session, and profile state management. It is vital in the configuration system, health monitoring, and provider architecture.

    And one more benefit is the user does not need to have the program for SVG images on their computer. They can get it from the internet, so it will be easy to add the SVG images. The spam bots will not snoop on the SVG image address. And the best thing is the other person will not be able to add the virus through SVG images, even in an accident.

    Process of adding SVG images from the Flutter app

    As technology develops in many fields, many business people use the SVG image service. They use this SVG image service to get many potential customers and sell their entire product effectively.

    The SVG images are the latest avatar in the world of communication and chatting, and people grab the opportunity of using it to its utmost. If you go for the best SVG image, you will be in an advantageous position, and there is hardly any doubt.

    There are best reasons people should avail of the service, and you must deal with the things individually. And if they find it cheap and of superb quality, they will waste a minimum of time grabbing it.

    Also Read: Why Is Flutter Popular In Mobile App Development?

    Avail of the services

    The SVG image service from the best company is quite affordable so that people of even more income can avail themselves of the service whenever they want.

    It is seen that a handful of people have used it for marketing and for promoting their products and company’s brand in a minimum of time. Thus, they have adopted the trick of adding this huge SVG image deluge and thus making their inbox appear clumsy and cluttered.

    Use in Flutter app

    Knowing the complete process of adding the SVG images will be more helpful for the user to add the SVG images effectively. Knowing all the procedures, like creating the Flutter app and then adding the SVG images using it, is the easiest way to add the SVG images.

    With the help of the other person will not be able to add the virus containing SVG images. So by following the above procedure, create your Flutter app and add the SVG images.

    Steps:

    Step 1: Add dependency

    	
    dependencies:
       flutter_svg: ^1.1.6
    

    Step 2: Get the dependency by

    	
    flutter pub get
    

    Step 3: Import plugin

    	
    import 'package:flutter_svg/flutter_svg.dart';
    

    Step 4: Use in the code, from asset by

    	
    SvgPicture.asset("assets/alarm_icon.svg");
    

    Step 5: From network

    	
    SvgPicture.network("");
    

    Step 6: Sample Code

    	
    import 'package:flutter/material.dart';
    import 'package:flutter_svg/flutter_svg.dart';
     
    class HomePage extends StatelessWidget {
      const HomePage({super.key});
     
      @override
      Widget build(BuildContext context) {
        return Scaffold(
            body: Center(child: SvgPicture.asset("assets/alarm_icon.svg")));
      }
    }
    

    Output

    Schedule an interview with WordPress developers

    Conclusion

    Using the SVG files is an excellent addition to the Flutter app development, but there are better answers to all your image problems. Observing the use cases and measuring an app’s performance with the SVG images is necessary, as there may be a need to replace the SVG image with the other standard image format like JPEG or PNG. A flutter_svg package gives a fast performance and is simple to use.

    Get the Knowledge of Flutter App with Bosc Tech Labs Resources. They will guide you throughout the process, help you add the SVG images, and know the perfect way to Flutter development. You can also hire Flutter developers ready to help you in every manner!

    Let’s get connected !

    Frequently Asked Questions (FAQs)

    1. What is the primary benefit of using SVG files?

    SVG images can be built and edited with any text editor. They can also be searched, indexed, scripted, and compressed. These images are scalable and are printed with high quality at any resolution.

    2. Why does Flutter development not support SVG?

    The SVG directory is in the code of Skia, and it is the primary component of Flutter development. However, Skia serializes the images into SVG files. Hence, it is impossible to decode or render the SVG images through the Skia.

    3. IS SVG based on the resolution?

    SVG provides, indeed, resolution-based techniques for presenting graphics on the web. The vector graphics format uses XML to define the primary properties like shapes, paths, colors, and fonts. It has more advanced features like gradients, filters, animation, and scripting.

    Book your appointment now

  • What is Showcaseview In Flutter?

    What is Showcaseview In Flutter?

    ShowCaseView is a simple and reliable package allowing identifying the different features of the application. The basic use of the ShowCaseView package consists of the target element. These can be easily passed with inputs that are highlighted on the translucent background. It is easier to pass the custom widget in ShowCaseView.

    Adding ShowCaseWidget

    Normally, the ShowCaseWidget widget is one of the amazing UI applications allowing the user to easily gain more advanced features. These involve various methods for decreasing grating features as well as showcasing parts of your application. It is quite useful when the user launches an application interestingly.

    The assistance of the Showcase and ShowCaseWidget widget can be added using the Flutter application development. This Flutter package allows highlighting or showcasing the widget in much.

    Below are the certain unused parameters of Showcase.withWidget() that are mentioned below:

    • Alignment
    • text style
    • description
    • description alignment
    • TextStyle
    • Color
    • tooltip background colour
    • tooltipBorderRadius
    • tooltipPadding

    The above showcase has many fundamental features of the applications. The well-known Flutter widgets has the component of features when the user clicks the screen. These are introduced in predefined requests.

    Below are the steps to install the widget so you can add a dependency to pubspec.yaml. It is quite an efficient option for getting the latest version for the ‘Installing’ tab in the pub.dev. Importing the package allows you to enable

    	
    Import 'package:showcaseview/showcaseview.dart';
    Adding a ShowCaseWidget widget
    ShowCaseWidget(
      builder: Builder(
    builder : (context)=> Somewidget()
      ),
    ),
    

    It is a suitable option for adding the showcase widget. You can start the ShowCaseView by building the UI. Implementing the Showcase in the Flutter is quite an easier process.

    These would show the better work for using the showcase view package on Flutter applications. It also showcases when the user presses on the screen or runs the app. The showcase also starts instantly on its main page. These are shown on the device in a more effective manner.

    	
    WidgetsBinding.instance.addPostFrameCallback((_) =>
    ShowCaseWidget.of(context).startShowCase([_one, _two, _three])
    );
    

    What Are The Functions Of Showcasewidget.of(Context):

    Scrolling the widget helps to attach the widget tree along with the screen. It especially uses the scroll view for rendering the widget on demand. These are possible with widget showcasing applied, so they are not attached to the widget tree.

    Flutter could not scroll the widget accordingly. Below is the list of functions that are involved in the ShowCaseWidget.of(context)

    • startShowCase(List)
    • – Starting the showcase

    • next()
    • – Starts next showcase

    • previous()
    • – Starts the previous showcase

    • dismiss()

    – Dismisses all showcases

    Scrolling To Active Showcase:

    Normally, the Auto Scrolling feature is available to active showcases, so they render the widget on demand(ex, ListView, GridView). Making the scroll view containing fewer numbers of children widget also prefers to choose SingleChildScrollView.

    It is quite a convenient option for assigning the ScrollController when using the SingleChildScrollView. These provide the manual scrolling option along with the positions.
    The showcase widget automatically increases the rendering facility. It allows adding the code with the onStart method for ShowCaseWidget.

    Also Read: Why Choose Flutter for MVP Development in 2023?

    What Are Its Parameters?

    Showcase view in Flutter involves various parameters, and some of them are listed below

    1. animationDuration:

    The animationDuration is a common parameter that is used for finding duration for animating parameters of containers. This parameter represents an important difference from one point in time to another.

    2. Key:

    The key is a parameter used for unique GlobalKey, and these are helpful for identifying the features showcased.

    3. Child:

    Child parameter is useful for a widget that can add a child with these. It is also convenient to have a layout for multiple children by adding widgets like Rows, Columns, or Stack. It is equipped with children’s property, and they provide children with widgets.

    4. Description:

    The description is one of the parameters which display the string on the showcased feature.

    5. Constructor:

    You can call the constructor underneath for utilizing the Showcase.

    How To Add A Showcase View In Flutter?

    Normally, there are many strategies involved with adding the Showcase view in Flutter. It is one of the amazing views suitable for gaining better UI designs. below are the steps for adding the ShowCaseView in Flutter

    1. Step 1: Implementation of Showcase view in Flutter

    Add the dependencies using the pubspec — YAML file
    Flutter:
    SDK: flutter
    showcaseview: ^1.1.6

    2. Step 2: Enable Assets

    Enable the assets to pubspec — yaml file.
    Assets:
    – assets/

    3. Step 3: Process For Making Quick Import

    	
    import 'package:showcaseview/showcaseview.dart';
    

    Step 4: Install Flutter packages

    Install the Flutter packages to get the root directory present in the app. It is convenient to implement them in the code respectively. Creating the new dart file called main. dart is essential for the lib folder.

    Implementing the showcase for individual widgets is quite an efficient option. You can wrap the game, allowing you to gain a Showcase view in Flutter. It is enabled by setting the builder parameter. These contain the Builder widget for returning ShowcaseDemo.

    	
    Widget build(BuildContext context) {
      return MaterialApp(
        title: 'Flutter ShowCase Demo',   
    debugShowCheckedModeBanner: false,
        home: Scaffold(
    body: ShowCaseWidget(
    builder: Builder(builder: (context) => const ShowcaseDemo()),
          ),
        ),
      );
    }
    

    The ShowCaseWidget involves knowing the widget for showcasing. It will be suitable for making the key added to the widget. There are five widgets for bringing consideration for the user with arriving along ShowcaseDemo.

    startShowCase involves various strategies in the initiation of the ShowcaseDemo. It is convenient to put the strategy calling inside the callback function.

    The callback function also gives the WidgetsBinding.instance and addPostFrameCallback(). It is also guaranteed that everything is executed accurately for building the feature.

    You can run the application by enabling the showcase to begin with the page build. These can be done by tapping the showcase button.

    	
    Widget build(BuildContext context) {
      return Scaffold(
        key: _scaffoldKey,
        ......
    )}
    

    Also Read: How To Export Fonts From Package In Flutter?

    First Showcase

    Showcase is added on AppBar. It is quite a convenient option for adding the description, child and key. The child is involved with adding the appropriate button. You can also add onPressed and an icon along with it.


    leading: Showcase(
      key: _first,
    description: 'Press here to open drawer', 
      child: IconButton(
        onPressed: () {
    _scaffoldKey.currentState!.openDrawer();
        },
        icon: const Icon(Icons.menu),
      ),
    ),
    

    Run this application to get the screen’s output such as the underneath screen capture, along with many more. These are effective in displaying the complete packages to the extent.

    Second Showcase

    The Second Showcase involves adding the app bar title along with the description, child and key. It is quite convenient to add the text “Flutter Showcase Demo” in a child. Adding the string called “This is a demo app title” can be added along with a description.

    	
    title: Showcase(
        key: _second,
    description: 'This is a demo app title',
        child: const Text('Flutter Showcase Demo')),
    

    Schedule an interview with WordPress developers

    Conclusion

    The above article explains Showcase’s basic structure in a Flutter. It is easier to modify this code based on your requirement. It is an introduction and implementation of the Showcase view in Flutter.

    By reading the above article, you have a clear idea about the showcase view in Flutter; you can hire Flutter developers from us and get the following best Flutter-app-related projects that will handle all the complicated tasks.

    Frequently Asked Questions (FAQs)

    1. How to use the showcase view in android development?

    You can view the new and latest feature on the third view with the library. Flow is: The first app is opened, the second and third item is clicked, and after that, Showcase is displayed. After this scenario, your user can modify the view through the back or bottom button.

    2. Which pattern is considered the best for Flutter development?

    The repository pattern is helpful for all Flutter experts in learning how to organize their code in a better and more manageable way.

    3. Which server is best for Flutter app development?

    Firebase is the Google-powered back-end service that works efficiently as the Flutter server-side. This platform gives various development tools which work on both mobile and web development. It is well-known for the JSON-enabled NoSQL database, which stores and syncs the data in real time.

    Book your appointment now

  • Why Is Flutter Popular In Mobile App Development?

    Why Is Flutter Popular In Mobile App Development?

    Nowadays, applications and mobile phones are becoming the most important part of our life, and it has also centralized the world. However, billions of users are using smartphones across the world. In addition, millions of the apps are available on Apple Store and Google Play store to download. However, there is tough competition in the mobile applications market, and many startups and developers are trying their best to deliver amazing services to app users.

    Therefore, app developers constantly look for quicker, easier, and less expensive methods to launch their mobile applications. In this phase, effective tools play an important role. From programming languages to app frameworks, programmers use them to identify how quickly they have the product in front of the end users.

    Let’s see why Flutter has achieved the rise in popularity and its features that make it the best for mobile app development.

    What are the Flutter Usage Statistics?

    Image source : statista.com
    Flutter is the most well-known cross-platform mobile framework that developers use. According to the 2021 survey, 42% of software developers use Flutter. Around one-third of mobile app developers use cross-platform technologies or frameworks, while others use native tools.

    Cross-platform mobile frameworks are used to develop an app that is accessible to a huge number of devices. A single code is used across multiple platforms for its easy portability, and in the end, it keeps the cost of software development low. With the cross-platform mobile framework, there is the possibility of maximum exploration of its targeted audience. For instance, an app can be targeted for both iOS and Android platforms, which will maximize the app’s reach. The global developer occupants is about to reach 28.7 million people by 2024, an increase of 3.2 million from the number viewed in 2020.

    What is Flutter?

    Flutter is the open-source UI toolkit created by Google and used to develop step-by-step mobile application development for mobile, web, and desktop with a single codebase.

    It was created to give tough competition to Facebook’s React Native. Still, Flutter has gained immense popularity in developing immersive apps for mobile and web apps and embedded and desktop apps.

    In Flutter, you can make beautiful, native cross-platform applications for iOS and Android platforms without worrying about any device. Flutter also gives a seamless experience across every viewing device.

    Flutter mobile apps are gaining an immense rise in the market because the apps built with Flutter capture the user’s attention with its properties like unified animation, faster time to market, affordability, and high performance. It becomes possible due to the Skia engine, Material Design, dart programming language, and Cupertino Widgets used by Flutter.

    What is Flutter App Development?

    Developing platform-independent apps that work on desktop, mobile, and web with the unified code and use Flutter as a UI toolkit is called Flutter app development.

    You can get a high-end, rich, and naturally immersive user experience for its clients via the Flutter app development. Single code means, Writing code once and running it everywhere. Hence, you can release the app across all the platforms in a single go. Hence, it saves time and money by rapidly launching your app in the market.

    Also Read: Best frameworks for Mobile App Development

    What are the Characteristics of Flutter app development?

    Let’s see some of Flutter’s major characteristics and make it a good option for creating custom eCommerce websites.

    • It gives a rich selection of widgets that must use for almost every type of business.
    • It has a well-known mobile operating system, iOS and Android development, which is almost compatible with them.
    • As a hybrid platform, app development companies can reach a larger audience. It needs less development time and has a large and vibrant developer community.
    • It gives constant customization and maintenance of the app development.

    Why is Flutter well-known in Mobile App Development?

    Flutter shows a great rise in popularity among mobile app developers. Let’s see some of the features that make it unique in the mobile development industry and have raised the demand for the Flutter app development company.

    1. Faster Development

    Flutter gives quick compilation and dynamic code writing, allowing you to see real-time changes. The Hot Reload feature will help you see the code’s live changes within seconds. Hence, developers can make them more productive by quickly making UI changes.

    2. Perfect for MVP products

    Flutter’s flexible UI, easy implantation, quick turnaround time, and high performance make it the best choice for MVP development. At an MVP stage, you usually need more time and money. It validates the app idea in the market or presents to the investors that there are better ideas than creating the app for the two platforms. Flutter uses a single codebase that helps you launch the apps that come across all platforms simultaneously, which aids you in saving time and money.

    3. Reusable widgets

    Flutter has come with an extensive set of customizable widgets catalog as these widgets are the structural elements wrapped with the material to design specific functionalities that can use for styling aspects like padding, setting fonts, etc. Hence, developers customize these ready-to-use widgets and compose their widgets in the multiple stages of the project.

    4. Simple learning curve

    Unlike other frameworks like React Native, Swift, and Java, Flutter is easy to learn. A UI open-source framework is much easier to learn and use if you have complete knowledge of the basics of Java and C#. Developers are looking to access source code that only needs to learn the basics of Dart.

    5. Dart codes

    Flutter uses object-oriented and strongly-typed dart code, which will act as the technical catalyst for the framework. Let’s see some of the few Dart’s fundamental aspects that make it requisite for Flutter development.

    • Just-in-time compilation
    • Eliminate the XML files
    • JavaScript bridge
    • Scaffolding

    Also Read: Which are the Best Flutter Widgets for App Development in 2022?

    6. Smooth Animation

    Flutter gives a huge number of widgets that aid you in creating apps that follow a material design. The Material motion system for Flutter helps make the smooth transition between UI elements and helps to give a smooth and rich look. Flutter has in-built adjustments like GUI rendering, gestures, and animation, allowing a developer to control each pixelated element on display. Hence, it enhances the framework’s capability to make a smooth and rich app with a custom layout.

    Schedule an interview with WordPress developers

    7. Support various IDEs

    Flutter platform gives the most-effective support to the various IDEs to create apps that include IntelliJ Idea, Codemagic, Android Studio, etc. However, it also suggested using editor plugins (IDE) for a better user experience.

    8. Excellent Developer Community

    The Flutter framework is backed by millions of developers who actively participate in helping the community and framework grow by helping others give ongoing support and fix bugs.

    9. Firebase integration

    Firebase in the Flutter implementation is Google’s Backend-as-a-service (BaaS) platform for developing web and mobile applications. Experts can benefit from the firebase services like databases, analytics, crash reporting, and messaging. Hence, developers can take benefit of the firebase functionality of the Flutter framework by utilizing it.

    Also Read: Top 10 Flutter app development tools

    Conclusion

    There are several reasons why experts believe that Flutter is undoubtedly the king of the mobile app development industry. The business benefits of Flutter are myriad. However, companies get their products to market quickly, reduce the cost, target multiple platforms and get the most clients at once.

    From a developer’s perspective, Flutter is easy to use and permits faster app development. Hence, the growing community ensures that any bugs and errors are promptly addressed!

    If you want to develop cross-platform apps using Flutter, hire Flutter developers from Bosc Tech Labs, as it assists you in development!

    Frequently Asked Questions (FAQs)

    1. Why is Flutter considered better than the other frameworks?

    The layered architecture grants developers control over every pixel and thus empowers them to make changes quickly and get into the intricate details of the design. Flutter does not rely on the native UI components to render. Hence, it uses an in-built Skia rendering engine and saves time.

    2. What makes the Flutter framework unique?

    Flutter is useful and can do the function using a single codebase. It means a coder can write the code once and run it everywhere in Flutter using the Dart UI coding language. As this code is natively compiled dependent on the platform/OS it is being run on.

    3. When should you make use of Flutter development?

    The applications developed in Flutter took little time to build and are also cost-effective. It is perfect for MVP startups when you are required to test your business model fast. Hence, Flutter app development costs less than native development for the two platforms.

    Book your appointment now

  • Dynamically Change The App Launcher Icon In Flutter

    Dynamically Change The App Launcher Icon In Flutter

    Flutter SDK is an open-source programming advancement pack for building attractive UI locally arranged. When we make a Shudder Venture, it accompanies the default Vacillate icon. The default icon can be changed to get the application distributed in stores like Google Play Store, Apple Application Store, and so on. In this article, we will investigate a couple of ways to accomplish something very similar.

    When fabricating a portable application in android or iOS stages, we need to change the default application name and launcher icon to a favored name and icon. This will be most helpful when sending an application to the play store or application store. This article will zero in on the most proficient method to change the application name and icon without any preparation in the Flutter structure.

    How to change the application launcher icon?

    It is essential to reference that while changing the application launcher icon better to pick a high-goal icon. You can create an Android application launcher icon through an Android icon generator or plan a launcher icon that suits your application utilizing another outsider application. Then, at that point, follow the underneath moves toward adding your launcher icon to your mobile application development.

    • Add the application launcher icon to the resources envelope of your undertaking and rename it as wanted.
    • Explore pubspec.YAML document, under dev_dependencies, adds the accompanying code snap. Click here to get more data on shudder launcher icons.
    • Save all changes that you make.
    • Go to the terminal, explore the shudder project area, and glue and run the accompanying orders.

    Why do we need to change the app launcher icon in Flutter?

    We want to compose the rationale for changing the application launcher icon in Flutter inside the press occasion [changeAppIcon] of the raised button gadget.

    With this, we finished the coding part for designing the dynamic application icons. After opening the venture in Xcode, add the application icon pictures inside the Sprinter/Sprinter envelope as displayed underneath. To get the component working, we want to add a few changes in info—the plist record, which is available inside the undertaker’s ios envelope.

    Add CFBundleAlternateIcons as a word reference inside the icon files (iOS 5) made previously. Make three-word references under CFBundleAlternateIcons, with the name like the icon pictures document name (for our situation, it is icon1, icon2 and icon3).

    For every word reference (icon1, icon2 and icon3), two properties — UIPrerenderedIcon and CFBundleIconFiles should be made. At long last, change the CFBundleIconFiles into an exhibit and add items with the worth as icon1, icon2 and icon3 for particular word references. Subsequently, we want to open the venture in XCode by right tapping on the iOS envelope.

    Specifying that and making a point to keep the dispersing correctly is critical. They take the complete solution and can develop it based on the Flutter development ideas. Changing the app launcher icon is the best way to explore Flutter for your desires.

    What are the two methods for changing the Application Icon?

    1. They are physically changing the documents of the Icon in Both Android and IOS envelopes by transferring every one of the expected icon sizes.

    2. We are utilizing a Bundle which will add every one of the extents of Icons in Android and IOS envelopes naturally.

    Move toward 1: Physically changing Icons

    Stage 1: Producing Different Estimated Icons

    • Go to https://appicon.co/and transfer the icon picture, tick the iPhone and Android choices, and tap on Produce. This site creates different estimated Icons for both android and IOS simultaneously.
    • It will Download the Compress document named AppIcons with the android and Assets. xcassets named envelopes alongside pictures for AppStore and playstore which can be straightforwardly transferred as an icon in both the stores.
    • Presently, open your Undertaking in Versus Code.

    Stage 2: Adding Icons in Android

    • Explore android/application/src/primary/res, right-click on res organizer, and snap “uncover in Pioneer”. Presently erase all the mipmap organizers in the res envelope and glue the mipmap organizers from the AppIcon/android envelope which you have downloaded.

    Stage 3: Adding Icons in IOS

    • Presently exploring the ios/Sprinter/Assets.xcassets. After you are in the Sprinter envelope, right-click on the Sprinter organizer and snap “uncover in Pilgrim”. Presently erase the Assets. xcassets envelope and glue the Assets. xcassets organizer from AppIcon/Assets.xcassets which you have downloaded.

    Stage 4: Run the Application

    • After physically changing the pictures in android and IOS envelopes, I currently go to lib/main.dart and run the vacillate project utilizing the underneath order in the Flutter console.

    Move toward 2: Utilizing Bundle ” Shudder Launcher Icons “

    We can create the different estimated Icons for Android and IOS by utilizing the bundle.

    Stage 1: Explore pubspec.YAML document.

    Open your Task in Versus Code and Go to pubspec.YAML document.

    Stage 2: Update the dev_dependencies.

    Go to dev_dependencies, add flutter_launcher_icons: “^0.8.0” reliance, and save the document. It will get the reliance.

    Stage 3: Add the reliance.

    Presently add the Flutter icons: and save.

    Stage 4: Add the Resources

    Presently make resources envelope – > make icon organizer – > add icon.png document.

    Stage 5: Download the conditions.

    Open the Terminal in VS Code and run

    Schedule an interview with WordPress developers

    Conclusion

    Thus, you can easily change the app launcher icon in Flutter depending on the requirements. They consider effective goals and maintain them by focusing on high-end documents.

    The icons should be turned out with a flexible change in the Flutter app development. The Flutter developers will know the best solution to change the app launcher icon in Flutter dynamically. Depending on the launch icon, it should be reliable to change in Flutter forever.

    So, it depends on the requirements and mentions by focusing on the download option. It makes an icon organizer with high-end results applicable for adding resources. It should be taken around the results and helpful for a reliable doc and save it. The above methods are useful for noticing it depends on the code and runs. It makes the icon organizer notice differently. It should be flexible based on the icon.png document option.

    Feel free to contact the leading Flutter app development company, which is ready to help you!

    Frequently Asked Questions (FAQs)

    1. What is the launcher icon in Flutter development?

    A Launcher icon is a graphic that will represent your app on the device’s home screen and also inside the launcher window. A user opens the launcher by simply touching the icon at the bottom of the Home screen. Hence, the launcher opens and exposes icons for all the installed applications.

    2. What makes an application dynamic?

    Dynamic applications are reliant on the online server or database. When connected, these apps are loaded from the central server so that any iterative changes to the development, design, or functionality are rolled out across all the devices simultaneously.

    3. Which widget type is utilized for the dynamic data in the Flutter framework?

    Flutter Dynamic Widget. A Backend-Driven UI toolkit creates the dynamic UI with JSON, and then the JSON format is very similar to the Flutter Widget Code.

    Book your appointment now